B2C Commerce Cloud Tracking Pages
Provide Real-time order status of orders and shipments. The recommendations are powered by Content Slots and Einstein AI.
Install the Zenkraft Cartridge
The Zenkraft cartridge is available in the Salesforce Commerce Cloud official LINK Marketplace.
Set up Tracking Pages
The shipment tracking page is available from the Zenkraft cartridge through the Zenkraft-Track route. The controller expects query string parameters in order to show the tracking and order information to the customer. The parameters include tracknumber, which is the tracking number, carrier for the carrier slug, and order for the order ID. order is an optional parameter, if it is set then the user is shown the line items of their order. If it is not set, then the section is not displayed.
The shipment tracking page also allows users to subscribe to shipment notifications when their shipment status has changed. For example, they could be notified when their shipment is out for delivery.
One of the best things about the shipment tracking page is that once you have the Zenkraft cartridge set up, there's no custom code needed in order to get it up and running. It is available at the Zenkraft-Track endpoint of your existing site.
To enable this functionality, just set the site preference to Yes:
and include your shipping account id. If you have multiple carriers you will need to utilize the Advanced Tracking JSON which you can see further down this page.
Shipment Tracking URL
In order to send your customers to the shipment tracking page, you'll need to construct the URL in the correct format. As mentioned earlier, the Zenkraft-Track route is where you'll send them. The URL requires two query string parameters: tracknumber and carrier, with an optional order parameter
- tracknumber: the tracking number associated with this shipment. e.g 789872318763
- carrier: the carrier slug associated with this shipment. e.g ups, fedex, royal_mail
- order: the SFCC order number. e.g 0000100
You can set up seo-friendly URLs so that your resulting URL will look something like:
https://www.yourbrandedsite.com/trackshipment?tracknumber=123456789&order=N1231231
This is done via Merchant tools -> URL Rules > Pipeline
URL and mapping, for example, track-shipment to the
Zenkraft-Track pipeline
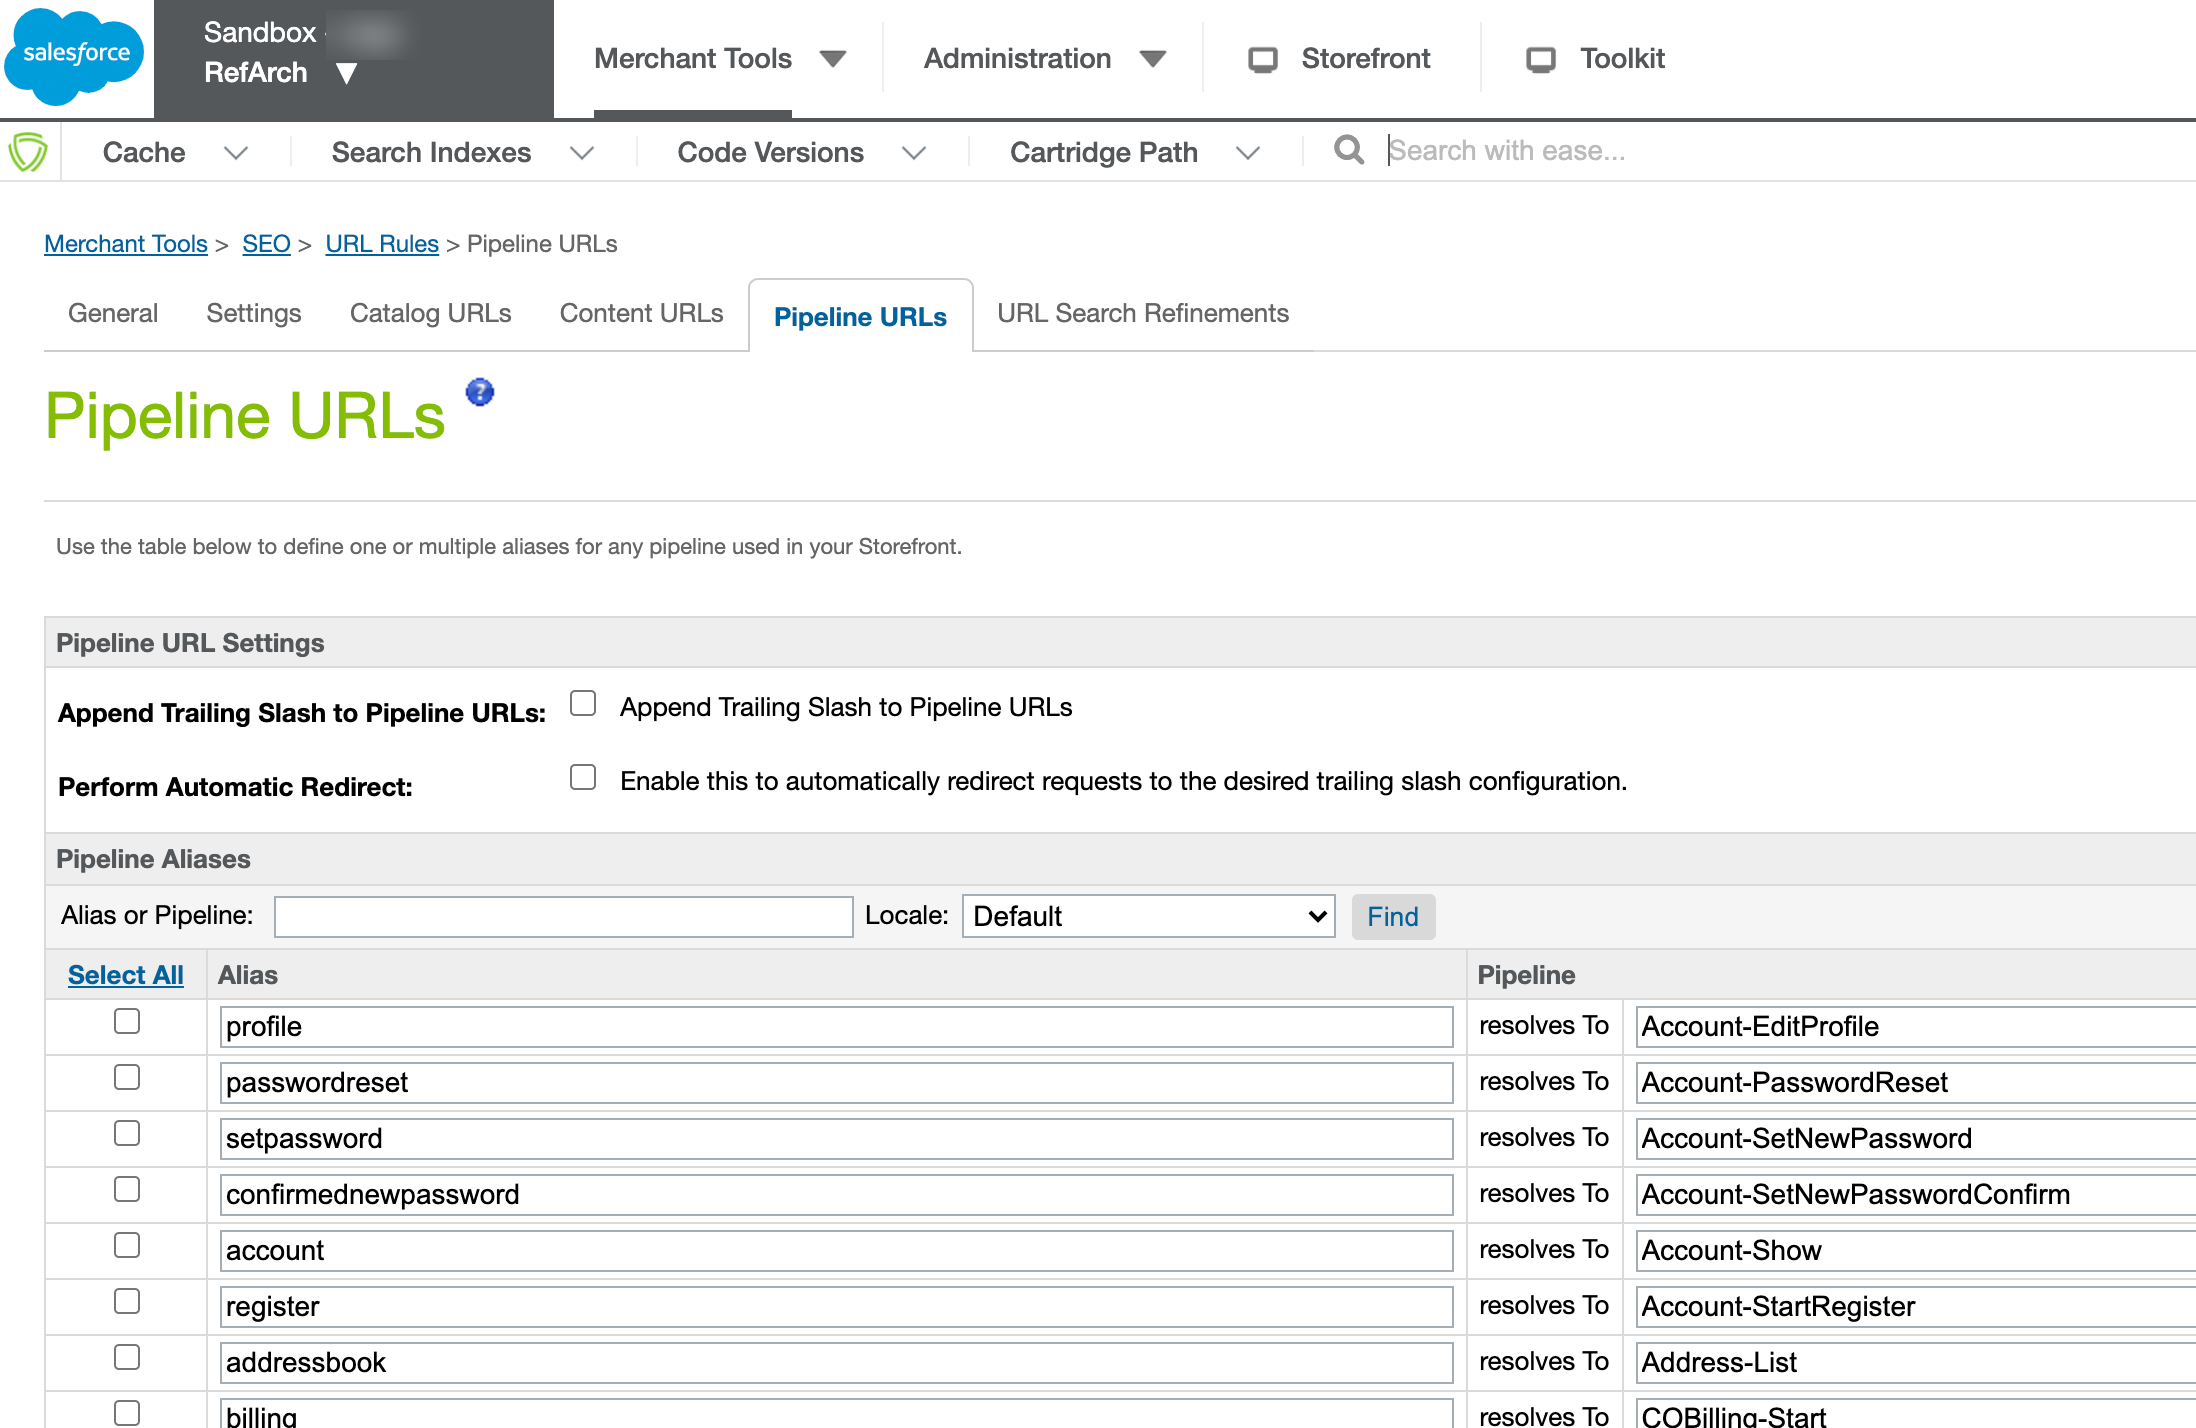
Note: If you do not see the pipeline mapping tables, you should enable the SEO Friendly
URLs for your instance.
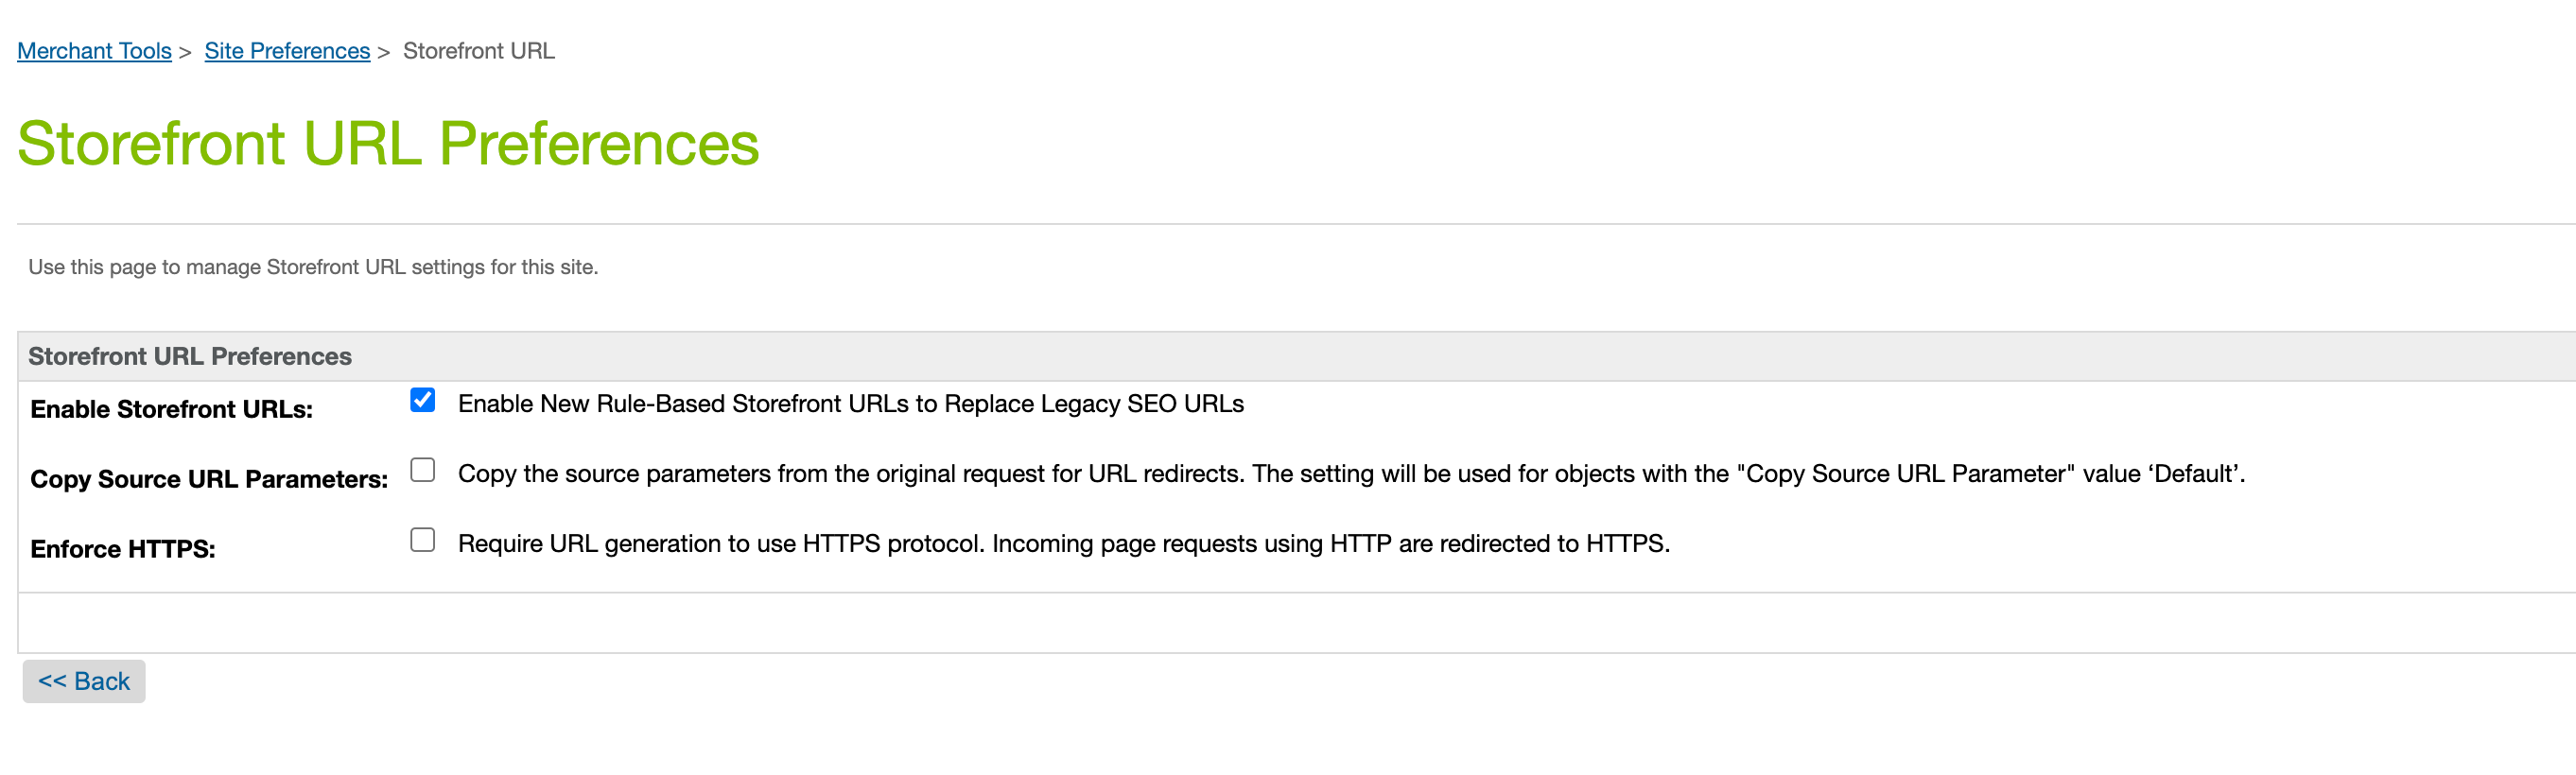
Navigate to Merchant tools -> Site Preferences > Storefront
URLs and Enable Storefront URLs
Enable/Disable Tracking
The restriction can be set via the Site Preferences, by going into Merchant tools > Site Preferences > Custom Preferences and open the Zenkraft Tracking Page Settings and change the Enable Zenkraft Tracking page
Tracking Settings JSON
For each carrier that you will be tracking with you need to set the related Zenkraft Shipping Account ID. This JSON is where you can add this. The DEBUG attribute is whether you want the debug logs to be visible for the Zenkraft support teams to help troubleshoot.
The slug such as fedex, ups, dhl, royal_mail are the API slugs of each carrier. If you are unsure what these should be please contact the Zenkraft Support Team.
{
    "fedex": {
        "DEBUG": "false",
        "SHIPPING_ACCOUNT": "1234567890"
    },
    "ups": {
        "DEBUG": "true",
        "SHIPPING_ACCOUNT": "23453564546"
    },
    "dhl": {
        "DEBUG": "true",
        "SHIPPING_ACCOUNT": "7654345311234"
    }
}
This setting can be set via the Site Preferences, by going into Merchant tools > Site Preferences > Custom Preferences and open the Zenkraft Tracking Page Settings and change the Zenkraft Tracking Settings JSON
Show Hide Order History
The cartridge allows your users to see the products that are included in the shipment they are tracking. This is where the order parameter comes in when you are building the URL.
The restriction can be set via the Site Preferences, by going into Merchant tools > Site Preferences > Custom Preferences and open the Zenkraft Tracking Page Settings and change the Enable Zenkraft Tracking On Order History
Only allow tracking for Logged In users
The cartridge supports a restricted tracking page settings, which means that you can restrict the tracking page to be displayed to logged-in customers only.
The restriction can be set via the Site Preferences, by going into Merchant tools > Site Preferences > Custom Preferences and open the Zenkraft Tracking Page Settings and change the Tracking page requires login
Tracking data model
There are two options to store the tracking data in SFCC - storing the data on the Shipment System Object, or using Custom Objects (zenkraftParcel) in Salesforce Commerce Cloud
This can be set via the Site Preferences, by going into Merchant tools > Site Preferences > Custom Preferences and open the Zenkraft Tracking Page Settings and change the Use Parcel Object for Tracking
The only time you would use the Custom Object (zenkraftParcel) is if you want to assign multiple unrelated shipment tracking numbers to an order. The majority of companies do not need to use this setting.
List of Custom Site Preferences
| Name | Description |
|---|---|
| Enable Zenkraft Tracking page | Enables the Tracking page. If enabled the page can be loaded via the 'Zenkraft-Track?tracknumber=777436548000&carrier=fedex&order=00001201' route. |
| Zenkraft Tracking Settings JSON | Tracking settings to allow for separate accounts per
carrier.
{
    "fedex": {
        "DEBUG": "false",
        "SHIPPING_ACCOUNT": "1234567890"
    },
    "ups": {
        "DEBUG": "true",
        "SHIPPING_ACCOUNT": "23453564546"
    },
    "dhl": {
        "DEBUG": "true",
        "SHIPPING_ACCOUNT": "7654345311234"
    }
}
|
| Enable Zenkraft Tracking On Order History | If enabled, tracking, carrier, and status will be displayed on the Order History |
| Use Parcel Object for Tracking | If set to true, then you need to create ParcelObject custom records for your tracking needs. This is useful when you have a non standard implementation of one Order to one Shipment to one Tracking Number |
| Tracking page requires login | Require customers to be authenticated to get order tracking information. |
Triggering Shipping Notifications
In the zenkraftJobs.js you have the flexibility to trigger notifications for shipments when they change their tracking status. In order to accomplish this, you can modify the code snippets below. You will see in line 25 you can make the callout to your email or sms provider to trigger the notifications.
        function sendNotification(notify, stage, shipmentNo, orderNo, trackStage, estimatedDate, trackingNo, carrier) {
            var Notify = require('*/cartridge/scripts/notifications');
            var notificationsData = notify.split(',');
            notificationsData.forEach(function (notificationData) {
                var notificationArray = notificationData.split(':');
                var notifyType = notificationArray[0];
                var notifyContact = notificationArray[1];
                if (notifyType === 'sms') {
                    // Connect to your sms service provider
                    // eslint-disable-next-line new-cap
                    Notify.SendSMSNotification(
                        notifyContact,
                        stage,
                        shipmentNo,
                        orderNo,
                        trackStage,
                        estimatedDate
                    );
                }
                if (notifyType === 'email') {
                    // Connect to your email marketing server or uncomment line 39-52 if you want to send the notification email from SFCC
                    // if (HookMgr.hasHook('app.zenkraft.notifiy.email')) {
                    //     HookMgr.callHook(
                    //         'app.zenkraft.notifiy.email',
                    //         'sendEmail',
                    //         notifyContact,
                    //         stage,
                    //         shipmentNo,
                    //         orderNo,
                    //         trackStage,
                    //         estimatedDate,
                    //         trackingNo,
                    //         carrier
                    //     );
                    // }
                }
            });
        }
The trackStage parameter represents the actual stage of the order and the code above can be adjusted to send notifications only when the order reaches a certain status.
Notifications are send only if the current status/stage of the order is different than the one that is stored on the shipment in Commerce Cloud.
This is handled cartridges/int_zenkraft_sfra/cartridge/scripts/zenkraftJobs.js::updateSystemShipment()
Upload Tracking Information with Invocable Method
Zenkraft provides an invocable method within Salesforce Service Cloud / Order Management to all you to update the Order Record within SFCC with a tracking number and products shipped once your shipment has been fulfilled.
Run Tests
If you don't have live tracking numbers for your carriers yet, you can use our test tracking numbers:
- TEST100000001 - information sent to carrier
- TEST100000002 - picked up
- TEST100000003 - in transit
- TEST100000004 - out for delivery
- TEST100000005 - delivered
- TEST100000006 - exception
- TEST100000007 - voided
- TEST100000008 - if the carrier returns inflight links to change the delivery
Please contact us for any more information and for next steps.