B2C Commerce Cloud Returns
Zenkraft enables self-service returns for 80+ Carriers from B2C Commerce. You can collect data about returns e.g. reasons for return and analyse them using Salesforce Reports and Dashboards.
- Install the Cartridge
- Basic Setup
- Return reasons
- Enable / disable product groups
- Auto Approve Returns
- Guest vs My Account Returns
- Returns Data Architecture
- Tracking Return Shipments
- Triggering refunds/notifications for return packages
- Advanced Configuration
- Sync Returns with Service Cloud/Order Management
- Resend returns
- Custom Fields
- Run tests
Install the Zenkraft Cartridge
The Zenkraft cartridge is available in the Salesforce Commerce Cloud official LINK Marketplace.
Basic Setup
If are are enabling returns for your customers using one carrier and one warehouse location, then fill in the fields in the Custom preference for Zenkraft Returns found under Merchant tools > Site Preferences > Custom Preferences > Zenkraft Returns.
Zenkraft Returns
| Site Preference | Description |
|---|---|
| Returns Shipping Account ID | Number representing the Returns Shipping Account ID (ex: 394893489238983). If you don't have this then please contact your Zenkraft account manager and they will be able to assist. |
| Returns Carrier ID | This is the carrier ID (ex: fedex, dhl) used when getting shipping information for returns. If you don't know what this is please contact your Zenkraft account manager and they will be able to assist. |
| Shipping Service | Must match the service type, for example fedex_ground. You can find these values by looking at our API docs pages and searching for Service Types. |
| Returns Packaging Type | The packaging type used by the carrier. Generally you can always use your_packaging, but if you have a specific packaging type that you want to use with your carrier you can set it here. You can find these values by looking at our API docs pages and searching for Packaging Types. |
| Recipient Address Street | Street address representing where items will be returned to |
| Recipient Address City | City representing where items will be returned to |
| Recipient Address State Code | State Code representing where items will be returned to |
| Recipient Address Postal Code | Postal Code representing where items will be returned to |
| Recipient Address Country Code | Country Code representing where items will be returned to |
| Recipient Company | Company name representing where items will be returned to |
| Recipient Name | Attention to name representing where items will be returned to |
| Recipient Phone Number | Phone number representing where items will be returned to |
| Recipient Email Address | Email representing where items will be returned to |
| Shipping Label File Type For Returns | Recommend using PDF, but you can request the shipping label in whichever format the carrier allows. You can find these values by looking at our API docs pages and searching for label_type |
| Currency Code for Returns | Currency Code to use for Zenkraft rates |
| Weight Units | Weight Units to be used with Zenkraft. |
| Default Product Weight for Returns | This is the default weight used when determining shipping information. It is only used if a weight is not defined on the product. |
| Return Reasons Configuration | JSON object representing reasons for returns and sub-reasons. More details are found later on is this guide. |
| Returns Require Approval | Set to true if all returns require approvals. More details are found later on is this guide. |
| Dimension Units | Units to be used for dimensions. IN = Inches, CM = Centimeters |
| Sync Return with Zenkraft | Sync returns information with your external platform such as Salesforce Order Management or Salesforce Core. More details are found later on is this guide. |
| Catalog categories requiring return approval | Comma separated list of catalogue categories that ensure returns need approval. More details are found later on is this guide. |
| Customer groups requiring returns approval | Comma separated list of customer groups that ensure returns need approval. More details are found later on is this guide. |
| Available days to submit return after order creation | Set the number of days after order creation in which the customer is allowed to automatically request a return. |
| Weight Units | Weight Units to be used. KG = kilograms, LB = pounds. |
| Set returns to be one to one related with order | Set true to enable returns to be related to order. We recommend setting this option to true, this means that you can't create multiple returns for the same item. |
| Catalog categories for non returnable items | List of comma separated with no white space catalog categories of products that cannot be returned. |
| Enable Zenkraft returns to require login | Set true to enable Zenkraft returns to require the user to be logged in. |
| Create new Return Object for each return | Create a Return object every time the customer creates a return via the storefront |
| Returns Reason Photo Maximum File Size | Maximum file size for return reason photos |
| Return Reason Photo Image Scaling | Scale for compressing the image file before uploading it to SFCC, based on the image layout. Portrait: image's maximum width Portrait: image's maximum height |
| Return Reason Photo Acceptable File Formats | Set true to enable Zenkraft returns to require the user to be logged in. |
| Shipping Preference | Salesforce Core/OMS Shipping preference. Please utilize the Salesforce ID (the 15-19 alphanumeric string). |
| Create single shipment for all return line items | Create a single shipment for the return order, regardless of the number of line items |
| Handler for Zenkraft Returns | Zenkraft Returns Implementation. Single choice dropdown with two possible values: SFCC and zenkraftAPI. If using zenkraftAPI, the returns information will be stored on the zenkraft API as opposed to locally on SFCC. |
If you need to configure multiple carriers based on country then using the Advanced JSON mentioned further below in this guide is what you will need to configure.
Return reasons
Return reasons are defined as a JSON object, this is managed via the returnReasonsConfig in the Zenkraft Returns Custom Site Preference.
You have have two levels of Return Reasons. For example the top level could be Damaged and the second level could be Damaged during shipment or Product was defective.
You can set up different return reasons on a category level or just leave a default across all product categories.
An example is below:
    {
        "reasons": [
            {
                "id": "wrong_size",
                "categories": [
                    "zk-default",
                    "mens-clothing-suits"
                ],
                "display": "Wrong Size",
                "values": [
                    {
                        "display": "Too Small",
                        "id": "to_small"
                    },
                    {
                        "display": "Too Large",
                        "id": "to_large"
                    },
                    {
                        "display": "Was not what I expected",
                        "id": "was_not_what_I_expected"
                    }
                ]
            },
            {
                "id": "damaged",
                "photoRequired": true,
                "categories": [
                    "zk-default"
                ],
                "display": "Damaged",
                "values": [
                    {
                        "display": "Damaged during shipment",
                        "id": "damaged_during_shipmenl"
                    },
                    {
                        "display": "Product was defective",
                        "id": "product_was_defective"
                    }
                ]
            },
            {
                "id": "incorrect",
                "categories": [
                    "zk-default"
                ],
                "display": "Incorrect Product",
                "values": [
                    {
                        "display": "I ordered the wrong product",
                        "id": "i_ordered_the_wrong_product"
                    },
                    {
                        "display": "I was sent the wrong product",
                        "id": "i_was_sent_the wrong_product"
                    },
                    {
                        "display": "This is not what I wanted",
                        "id": "this_is_not_what_i_wanted"
                    }
                ]
            },
            {
                "id": "suit_jacket_issue",
                "categories": [
                    "mens-clothing-suits"
                ],
                "display": "Suit Jacket Issue",
                "values": [
                    {
                        "display": "Too Small",
                        "id": "to_small"
                    },
                    {
                        "display": "Too Large",
                        "id": "to_large"
                    },
                    {
                        "display": "Does not match with trousers",
                        "id": "does_not_match_with_trousers"
                    }
                ]
            }
        ]
    }
You can see that it's possible to assign the return reasons to specific product categories. To use the default category for all products you can just set the category to be zk-default.
You will also see the "photoRequired": true, that can be added. This requires that a photo is uploaded for this type of return reason. This photo is then stored in your WebDav folder and the reference to the file in your WebDav folder is then saved on the return line.
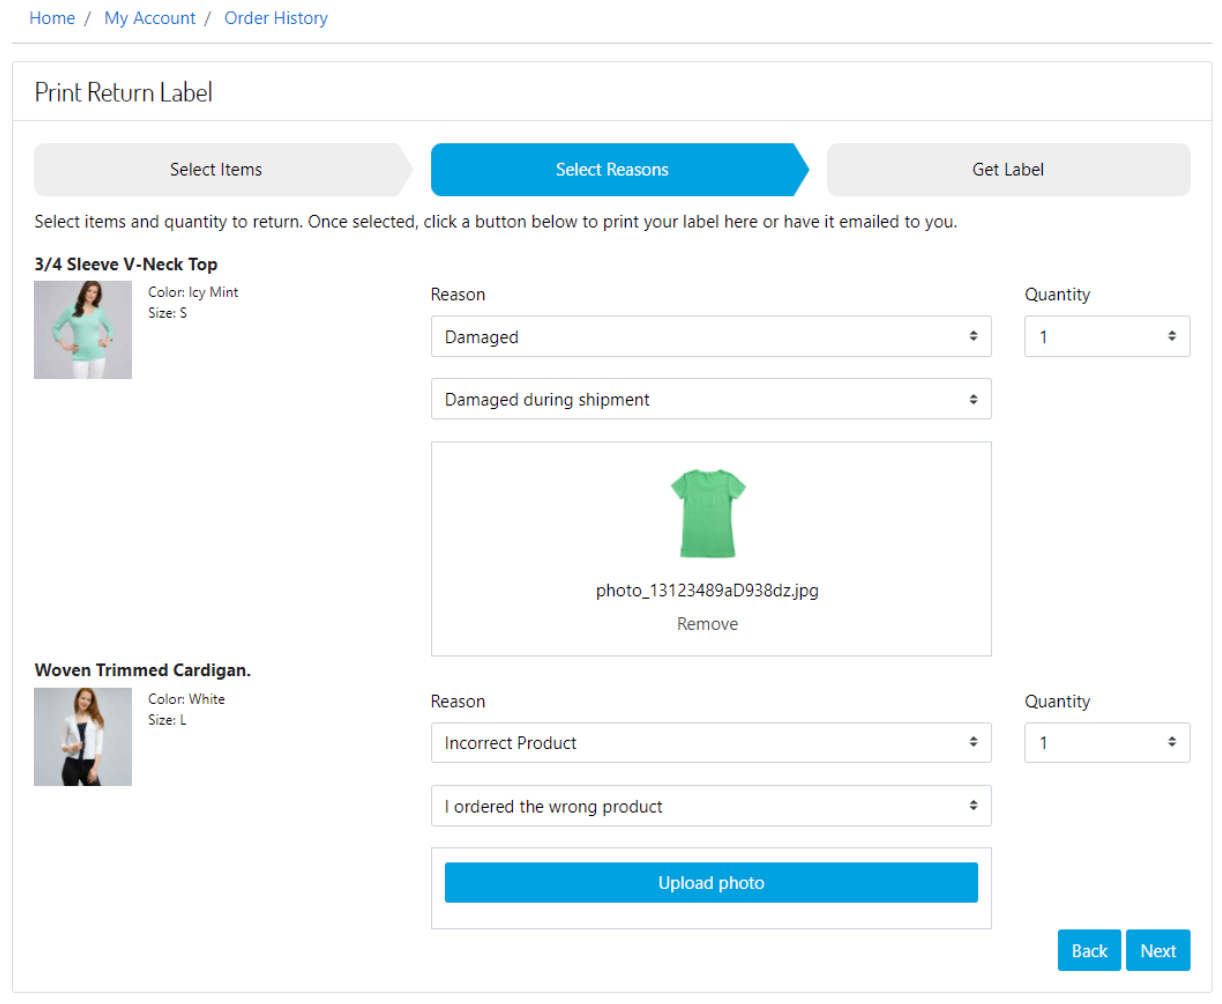
Some returns can require a picture of the ordered product, showing the merchant additional proof for the selected return reason. This “return reason photo” needs to be uploaded before the client creates a return label for an existing order.
The upload form will be available in the process of making the return label, whenever the user chooses a
return reason requiring it. The uploaded file needs to be compatible with restrictions made by the
merchant for its size and format.
After uploading the file to the webpage, if its size and format are supported, the image file will be
given a preview image and an option button to be removed.
Upon completing the creation of the return label, the image files will be uploaded and kept in the chosen storage cloud, and the file path for each upload will be binded to the return order.
Configuration
Every return reason which requires a “reason photo”, must be set in the website’s ZenKraft site preferences. Furthermore, for the same custom site preference group should be set the preferences for upload photo maximum file size limit, and acceptable file extensions for the image files.
Photo upload on return reasons are defined as a JSON object, this is managed via the returnReasonsConfig in the Zenkraft Returns Custom Site Preference.
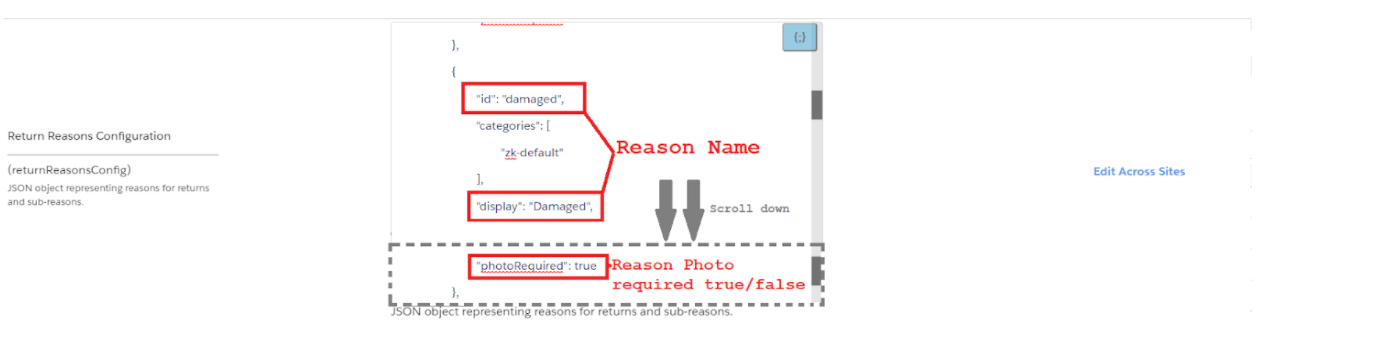
Example:
Note "photoRequired": true on damaged reason
                {
                    "reasons": [
                        .......
                        {
                            "id": "damaged",
                            "categories": [
                                "zk-default"
                            ],
                            "display": "Damaged",
                            "values": [
                                {
                                    "display": "Damaged during shipment",
                                    "id": "damaged_during_shipmenl"
                                },
                                {
                                    "display": "Product was defective",
                                    "id": "product_was_defective"
                                }
                            ],
                            "photoRequired": true
                        }
                        ......
                    ]
                }
In addition to the configuration on reason level, there are specific configurations that allow the site administrator to customize the types of files that are allowed for upload, and their size
The configurations are available under Site Preferences > Custom Preferences > Zenkraft Returns
- Returns Reason Photo Maximum File Size - preference and edit its value depending on the maximum acceptable file size in KB(kilobytes). Default value is 2048
- Return Reason Photo Acceptable File Formats - preference and add/remove the acceptable file extensions. Note: For convenient reasons the file extensions should be image file formats acceptable by the browser - such as jpg, png or gif.
When a return with a photo attachment is created, the provided file is uploaded to the local WebDav
filesystem of the instance. By default the file is stored in the TEMP folder.
The path to the uploaded file is stored on the zenkraftReturnLineItem custom object, in the
reasonPhotoUrl custom attribute.
Enable / disable product groups
The cartridge provides the functionality to disallow the return of products by group
This can be configured through the Site Preference found under Merchant tools > Site Preferences > Custom Preferences > Zenkraft Returns group.
Once in that group, scroll and find Catalog categories for non returnable items
Add the list of categories as a comma separated list. In order to be defined as non-returnable the products should have that same category assigned as primary category.

Auto Approving Returns
At a site level you can set whether your customers can request a return (that needs to be manually approved by your Customer Success team), or automatically allow them to create a return. This can be further constrained by product category type.
Some examples for this could be that extra heavy items that require special return services, might need to be approved by your Customer Success teams, before the user can create the label. If you do have a requirement for manually approving returns this usually works in conjunction with another system such as Salesforce Service Cloud/Order Management or another external service that can integrate with Salesforce Commerce Cloud.
The Custom preference for Zenkraft Returns can be found under Merchant tools > Site Preferences > Custom Preferences > Zenkraft Returns. Once in that group, scroll and find Returns Require Approval.
All Returns Require Approval
If you want to approve all returns then set this to Yes. This means that the shipping label will not be created automatically, and the shipping label will need to be set on the return line before the customer can download the label to print.
Returns Require Approval for specific categories
If you have set Returns Require Approval to No then you can force returns to require approval for these product categories inputted here. They need to be comma-separated.

Customer groups requiring returns approval
If you have set Returns Require Approval to No then you can force returns to require approval for these customer group categories inputted here. They need to be comma-separated.

Guest vs My Account Returns
Zenkraft cartridge can be configured to allow guest customers to create returns, or to force only registered customers to use that functionality.
The registered vs guest returns can be configured via a site preference in Zenkraft Returns group.
Navigate to Merchant tools > Site Preferences > Custom Preferences > Zenkraft Returns

Returns Data Architecture
The returns data can either be stored in SFCC in a custom object records, or the data can be stored on the Zenkraft Platform. The custom preference that determines this is called "Handler for Zenkraft Returns".
Data Stored in SFCC
The two custom objects that store the return data are:
- zenkraftReturn
- zenkraftReturnLines
Each of the objects is responsible for either storing the basic order return information, or the
order lines of a
return order, including the base64 labels of the returns.

You can view the returns data in the Business Manager, by navigating through Merchant tools >
Custom Objects > Custom Object Editor
and select the object that you want to view/edit (zenkraftReturn or zenkraftReturnLines)
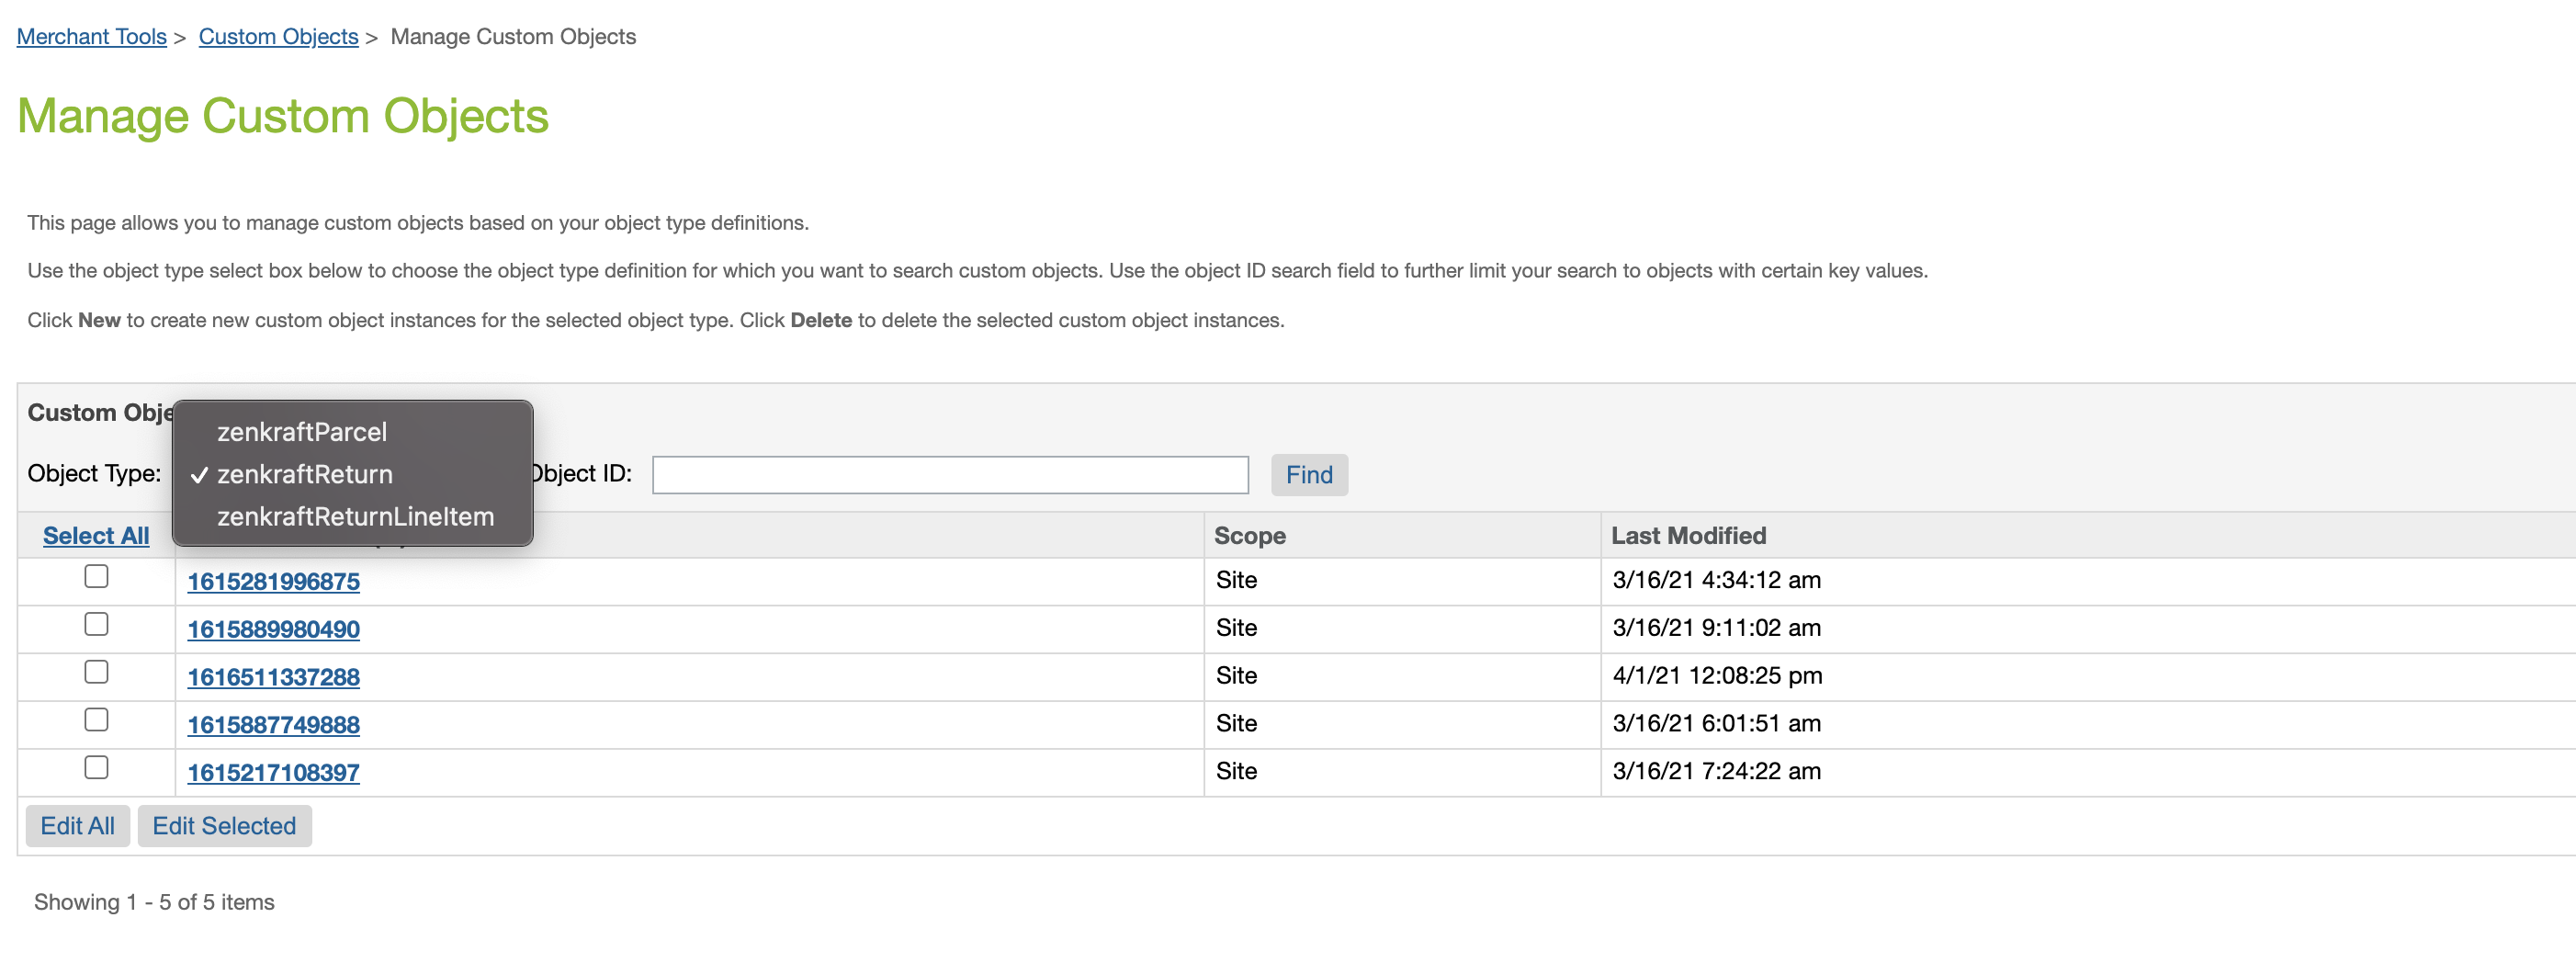
Search for the return order that you need, and open the records
Depending on the object you will see data related to the order itself - which will include label information, related order lines, SFCC order number and data related to the creation and last update data such as tracking information.
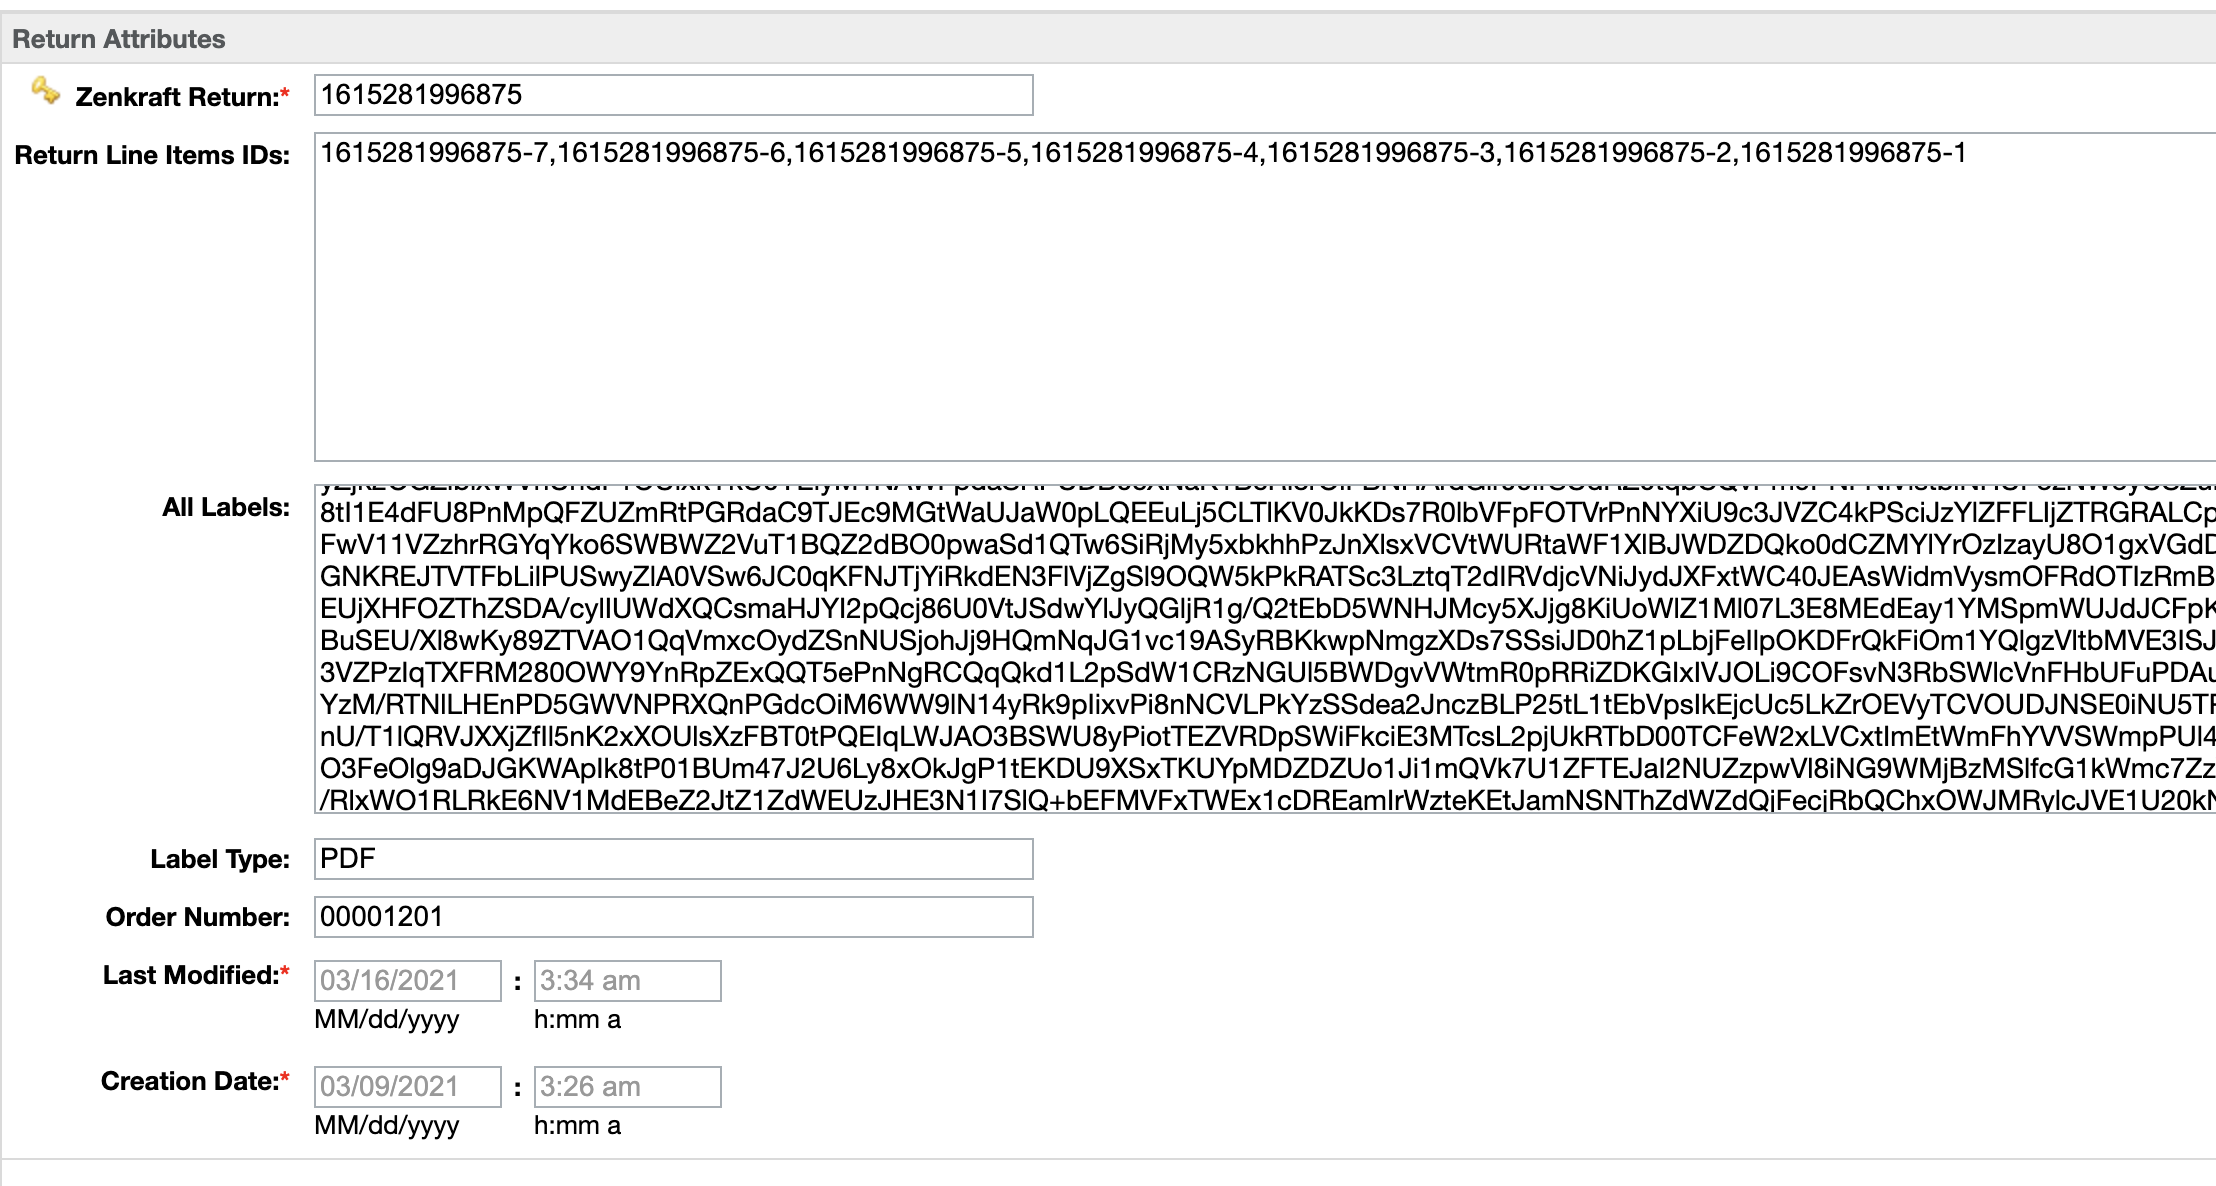
zenkraftReturn
| Name | ID | Description |
|---|---|---|
| Zenkraft Return | id | The ID of this return object |
| Return Line Items IDs | returnLineItems | The IDs of the related ReturnLine objects associated to this return |
| All Labels | allLabels | The label associated to this return in Base64 encoded format. |
| Label Type | labelType | The label type, usually its PDF, and this is set under your ZenrkaftReturns custom preferences group. |
| Order Number | orderNumber | The Order Number related to this return. |
| Last Modified | lastModified | The date and time this was last modified |
| Creation Date | creationDate | The date and time this was created |
| Combined Label | combinedLabel | The combined label associated with this return. Encoded in base64 format |
zenkraftReturnLineItem
| Name | ID | Description |
|---|---|---|
| Reason Code | reasonCode | The JSON of the reason why this item was returned |
| Sub Reason Code | subreasonCode | The JSON of the sub-reason why this item was returned |
| ID | id | The ID of this returnLineItem object |
| Return ID | returnID | The Return ID this item belongs to |
| Product ID | productID | The Product ID of the item in the return line |
| Tracking Number | trackingNumber | The tracking number for this return line |
| Approved Date | approvedDate | Date and time this returnline was approved. |
| Carrier | carrier | The carrier used |
| Rejected Date | rejectedDate | Date and time this returnline was rejected. |
| Label Type | labelType | The label type. e.g PDF, PNG. |
| quantity | quantity | The quantity of the product returned. |
| Last Modified | lastModified | The date and time this was last modified |
| Creation Date | creationDate | The date and time this was created |
| Tracking Stage | trackingStage | The tracking stage of this return item. e.g CREATED, PICKED_UP, IN_TRANSIT, OUT_FOR_DELIVERY, DELIVERED, EXCEPTION |
| Tracking Description | trackingDescription | The description back from the carrier on the status of this shipment. |
| Tracking Status | trackingStatus | A subcode that occasionally the carriers return, this is generally ignored. |
| Estimated Delivery Date | estimatedDeliveryDate | If the carrier updates the estimated delivery date then this field is updated to reflect the new information. |
| Tracking Last Modified Date | trackingLastModifiedDate | The last time that a track request was made for this shipment |
| Refund deduction | refundDeduction | A field for you use if you want to populate any refund deduction information. |
| Label | label | The Base64 encoded label for this return line. |
| Return address for item | returnAddress | Return address for the return line item. |
| PLI UUID | pliUUID | (Internal) UUID of the Product line item |
| Returns Reason Photo URL | reasonPhotoUrl | Path to the reason photo file in your WebDav folder |
Data Stored on the Zenkraft Platform
If you are expecting a high volume of returns, more than 5,000 a month then its recommended you utilize the Zenkraft Platform to store your data so you don't hit any SFCC limits.
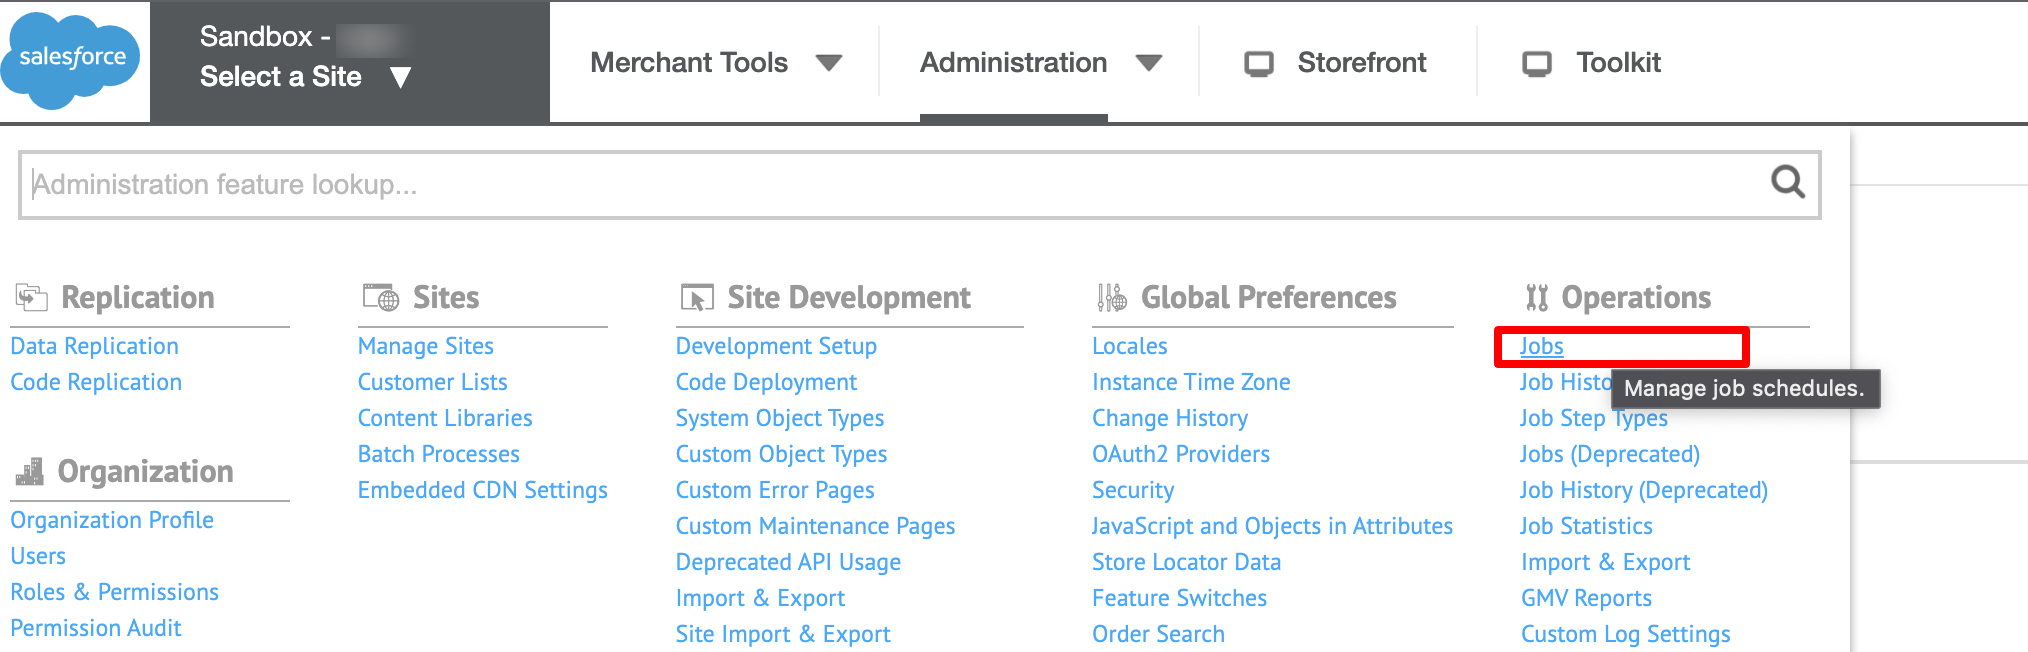
Tracking Return Shipments
In order to get tracking updates for any return shipments created you need to set up the SFRAUpdateReturnCases job. Please navigate to Administration > Operations > Jobs and configure the job SFRAUpdateReturnCases job.
We recommend scheduling it to run every 12 or 24 hours.
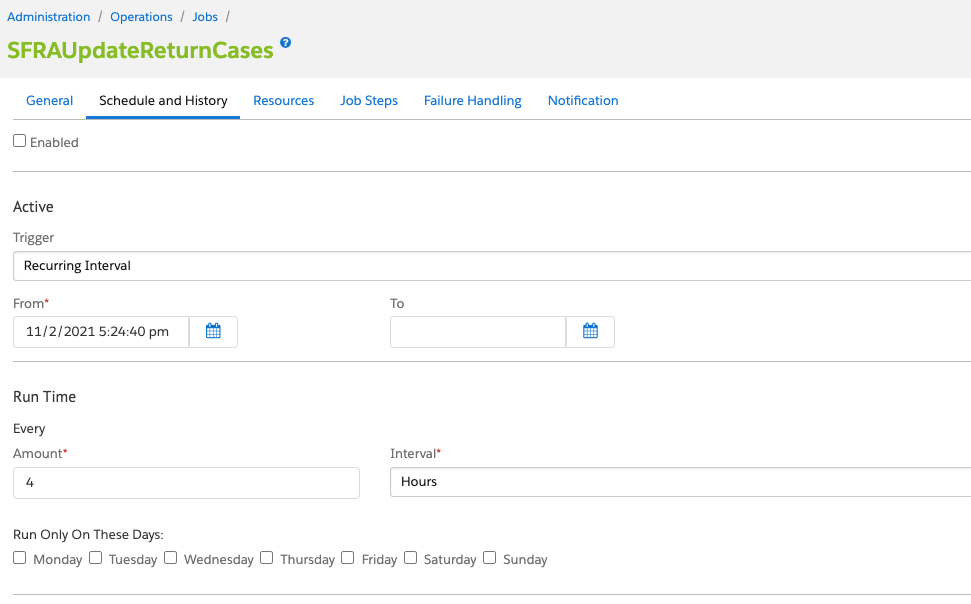
The job will request tracking updates from the carriers, and will update the returnLine object with the status, and tracking stage whenever there is a change.
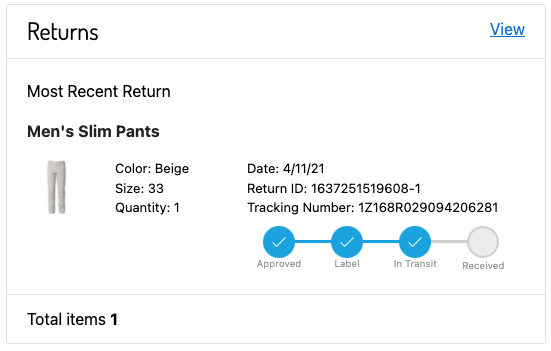
This tracking status will then be viewable by your customers within their Account and Returns History.
Triggering refunds/notifications for return packages
Thanks to the tracking job, in the previous step, you will know once your customer has posted the item back to you. You can then trigger your own events such as email notifications or even refunds.
If you look at the zenkraftJobs.js file, you will see in line 204 you have the hook, that you can utilise to make the callout to your payment gateway to trigger the refund or send email notifications.
    // Optional Hook to issue trigger your own notification/refund once the return package has been delivered
    if (trackInfo.tracking_stage === 'DELIVERED') {
        hooksHelper('app.zenkraft.returns', 'refund', [returnLineItem], function () {});
    }
Using Zenkraft API to handle returns
When Zenkraft API is enabled as returns handler, the return order updates are sent as a POST request from the API side to SFCC on the Zenkraft-Notify endpoint (https://xxxxxx.commercecloud.salesforce.com/on/demandware.store/Sites-RefArch-Site/en_US/Zenkraft-Notify).
The cartridge contains basic implementation in cartridge/controllers/Zenkraft.js and should be extended as per client`s requirements.
                server.post('Notify', zenkraftMiddleware.customOcapiAuth, function (req, res, next) {
                    var objects;
                    var response = {};
                    try {
                        objects = JSON.parse(request.httpParameterMap.getRequestBodyAsString());
                    } catch (e) {
                        response.msg = 'Cannot parse request.';
                        response.error = e;
                        res.json(res);
                        return next();
                    }
                    if (objects.shipment && objects.shipment.status) {
                        switch (objects.shipment.status) {
                            case 'CREATED':
                                require('dw/system/Logger').debug('Order is in CREATED status');
                                break;
                            case 'IN_TRANSIT':
                                require('dw/system/Logger').debug('Order is in IN_TRANSIT');
                                break;
                            case 'DELIVERED':
                                require('dw/system/Logger').debug('Order is DELIVERED');
                                break;
                            default:
                                require('dw/system/Logger').warn('Unknown status.Nothing to handle');
                        }
                    }
                    res.json({
                        success: true
                    });
                    return next();
                });
Advanced Configuration
If you are looking to allow returns from multiple countries, you can utilise the ZenkraftAdvanced Custom preferences, to split out by country where the returns should go to and also which carrier the returns should use.
The configuration can be defined using JSON under the Advanced Configuration section. Go to Merchant tools > Site preferences > Custom preferences in the ZenkraftAdvanced group.
You will see the JSON under the Zenkraft Advanced JSON Object an example of which you will see below:
{
    "RETURN": {
        "US": {
            "advanced": false,
            "ACCOUNT_ID": "474557840",
            "CARRIER_ID": "ups",
            "SERVICE_TYPE": "ups_ground",
            "PACKAGING": "your_packaging",
            "CURRENCYCODE": "USD",
            "DIM_UNITS": "IN",
            "WEIGHT_UNITS": "LB",
            "FILETYPE": "PDF",
            "ADDRESS": {
                "STREET": "10062 Treena Street",
                "CITY": "San Diego",
                "STATECODE": "CA",
                "POSTALCODE": "92131",
                "COUNTRYCODE": "GB",
                "COMPANY": "Zenkraft Default",
                "NAME": "Zenkraft Default",
                "PHONE": "1231231233",
                "EMAIL": "warehouse@example.com"
            },
            "SHIPPING_PREFERENCE": "12312321"
        },
        "GB": {
            "advanced": false,
            "ACCOUNT_ID": "411111110",
            "CARRIER_ID": "fedex",
            "SERVICE_TYPE": "fedex_ground",
            "PACKAGING": "your_packaging",
            "CURRENCYCODE": "GBP",
            "DIM_UNITS": "CM",
            "WEIGHT_UNITS": "KG",
            "FILETYPE": "PDF",
            "ADDRESS": {
                "STREET": "1 Market Street",
                "CITY": "London",
                "STATECODE": "",
                "POSTALCODE": "EC2V 7RS",
                "COUNTRYCODE": "GB",
                "COMPANY": "Zenkraft Default",
                "NAME": "Zenkraft Default",
                "PHONE": "1231231233",
                "EMAIL": "warehouse@example.com"
            }
        },
        "batteries": {
            "advanced": true,
            "rules": {
                "custom.color": "ED5",
                "custom.batteryType": "Lithium Ion",
                "custom.styleNumber": "P0150"
            },
            "ACCOUNT_ID": "474557840",
            "CARRIER_ID": "ups",
            "SERVICE_TYPE": "ups_ground",
            "SHIP_ACCOUNT": "132174644",
            "PACKAGING": "your_packaging",
            "CURRENCYCODE": "USD",
            "DIM_UNITS": "IN",
            "WEIGHT_UNITS": "LB",
            "FILETYPE": "PDF",
            "ADDRESS": {
                "STREET": "94 Jockey Hollow Street",
                "CITY": "Brooklyn",
                "STATECODE": "NY",
                "POSTALCODE": "11211",
                "COUNTRYCODE": "US",
                "COMPANY": "Zenkraft Default",
                "NAME": "Zenkraft Default",
                "PHONE": "1231231233",
                "EMAIL": "warehouse@example.com"
            }
        }
    }
}
The JSON allows you to configure the return to address, shipping account, and packaging type based on country. In the example above you can see we have options for returning to the US and GB.
You can also define an advanced rule for the returns
"advanced": true
which looks at the rules defined
"rules": {
    "custom.color": "ED5",
    "custom.batteryType": "Lithium Ion",
    "custom.styleNumber": "P0150"
},
and if any of the products fall within the rules, then this address, shipping account, and packaging type is utilised.
If there is no match between the advanced rules and the current basket, the cartridge will try to match the configuration object based on the country code of the order and use that definition for the return process.
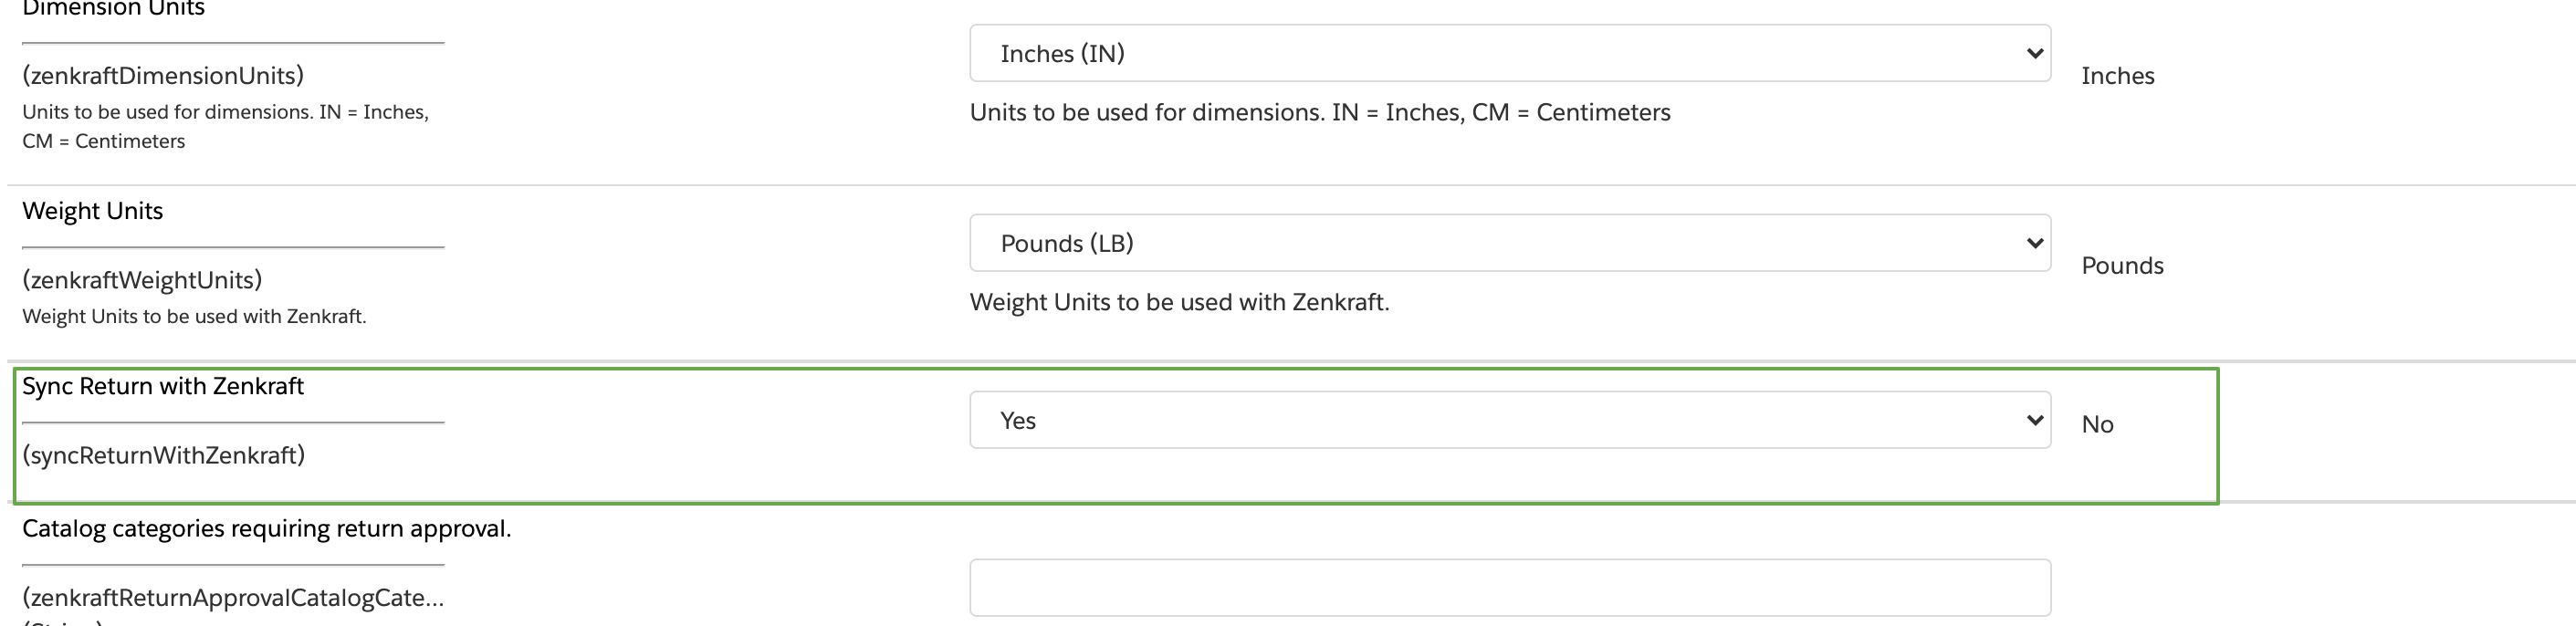
Sync Returns with Order Management
The cartridge can be configured to push data back to Salesforce Service Cloud / Salesforce OMS.
This can be enabled from the Site Preferences > Zenkraft Returns group, by setting the Sync Return with Zenkraft preference to Yes.
You need to authenticate the Zenkraft API to connect to your Salesforce Service Cloud/Order Management instance. Please contact your Zenkraft account manager on how to do this.
If you have any issues then please contact your Zenkraft technical representative to help with the setup of the authentication into your Salesforce instance.
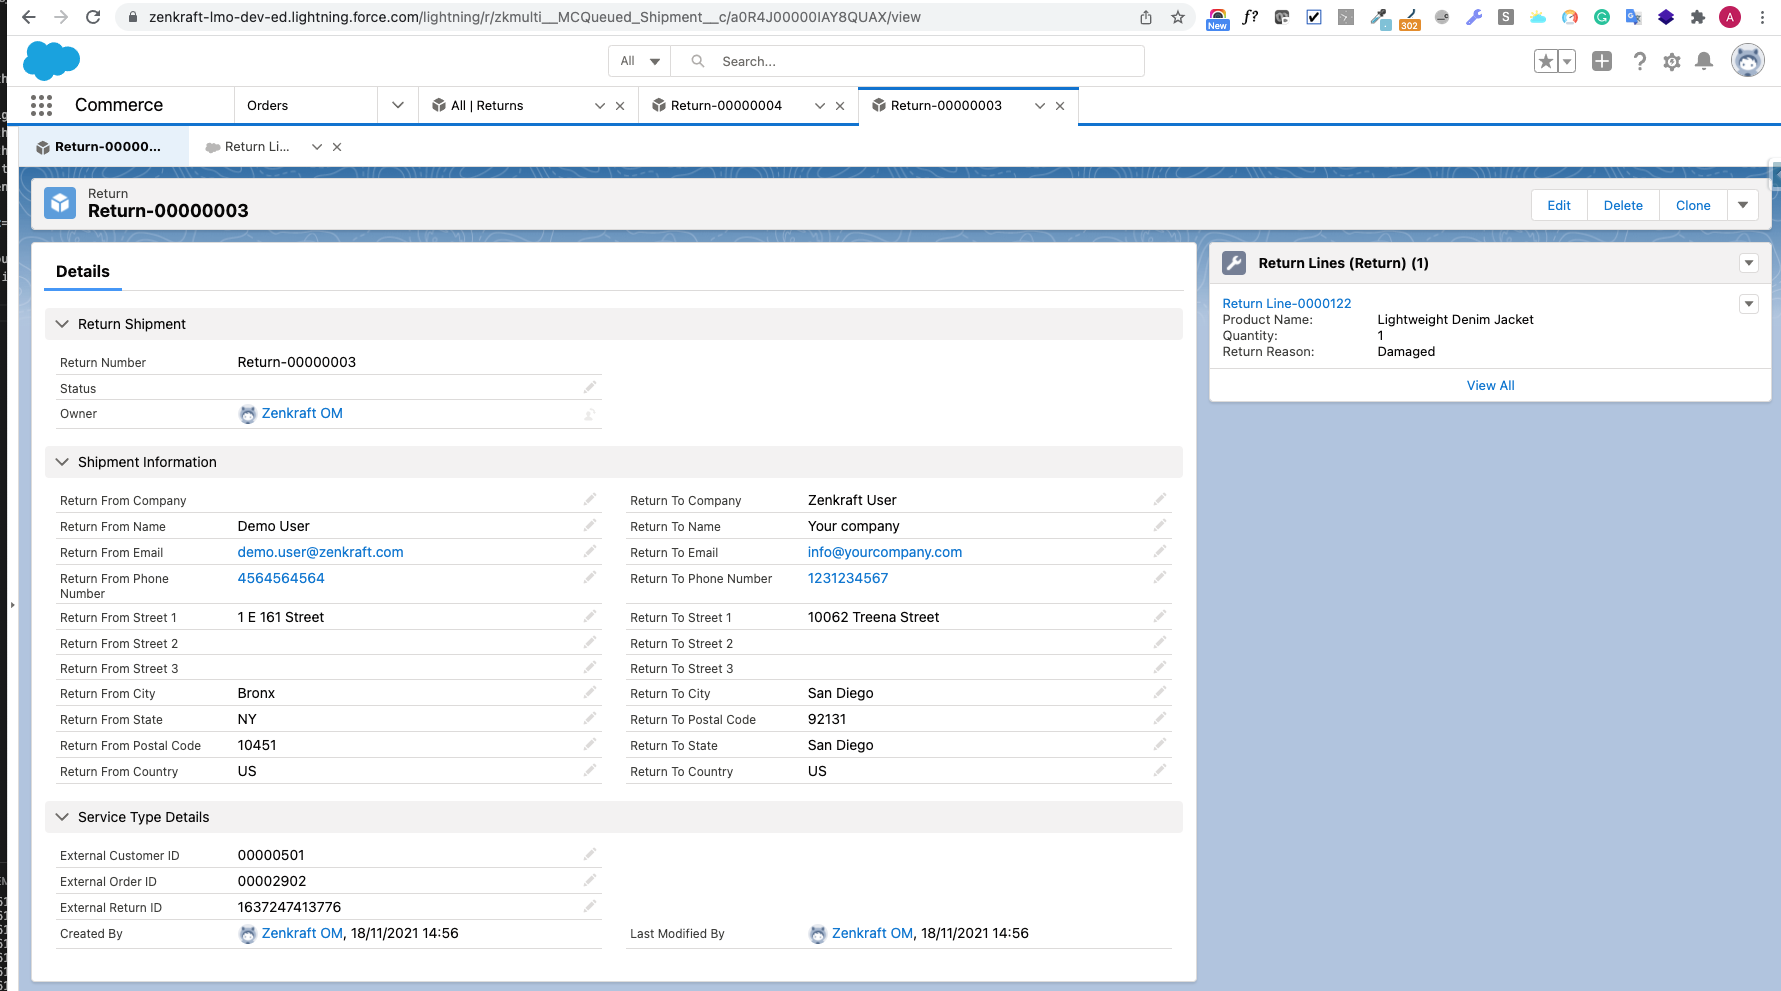
Once you have authenticated your Salesforce instance and you have turned the setting above to Yes, then whenever a return is created within Commerce Cloud, the information about the return and return lines will be populated within your Salesforce instance. The names of the objects in your Salesforce instance will be Returns and Return Lines as you can see from teh screenshots below.
Return:
Return line:
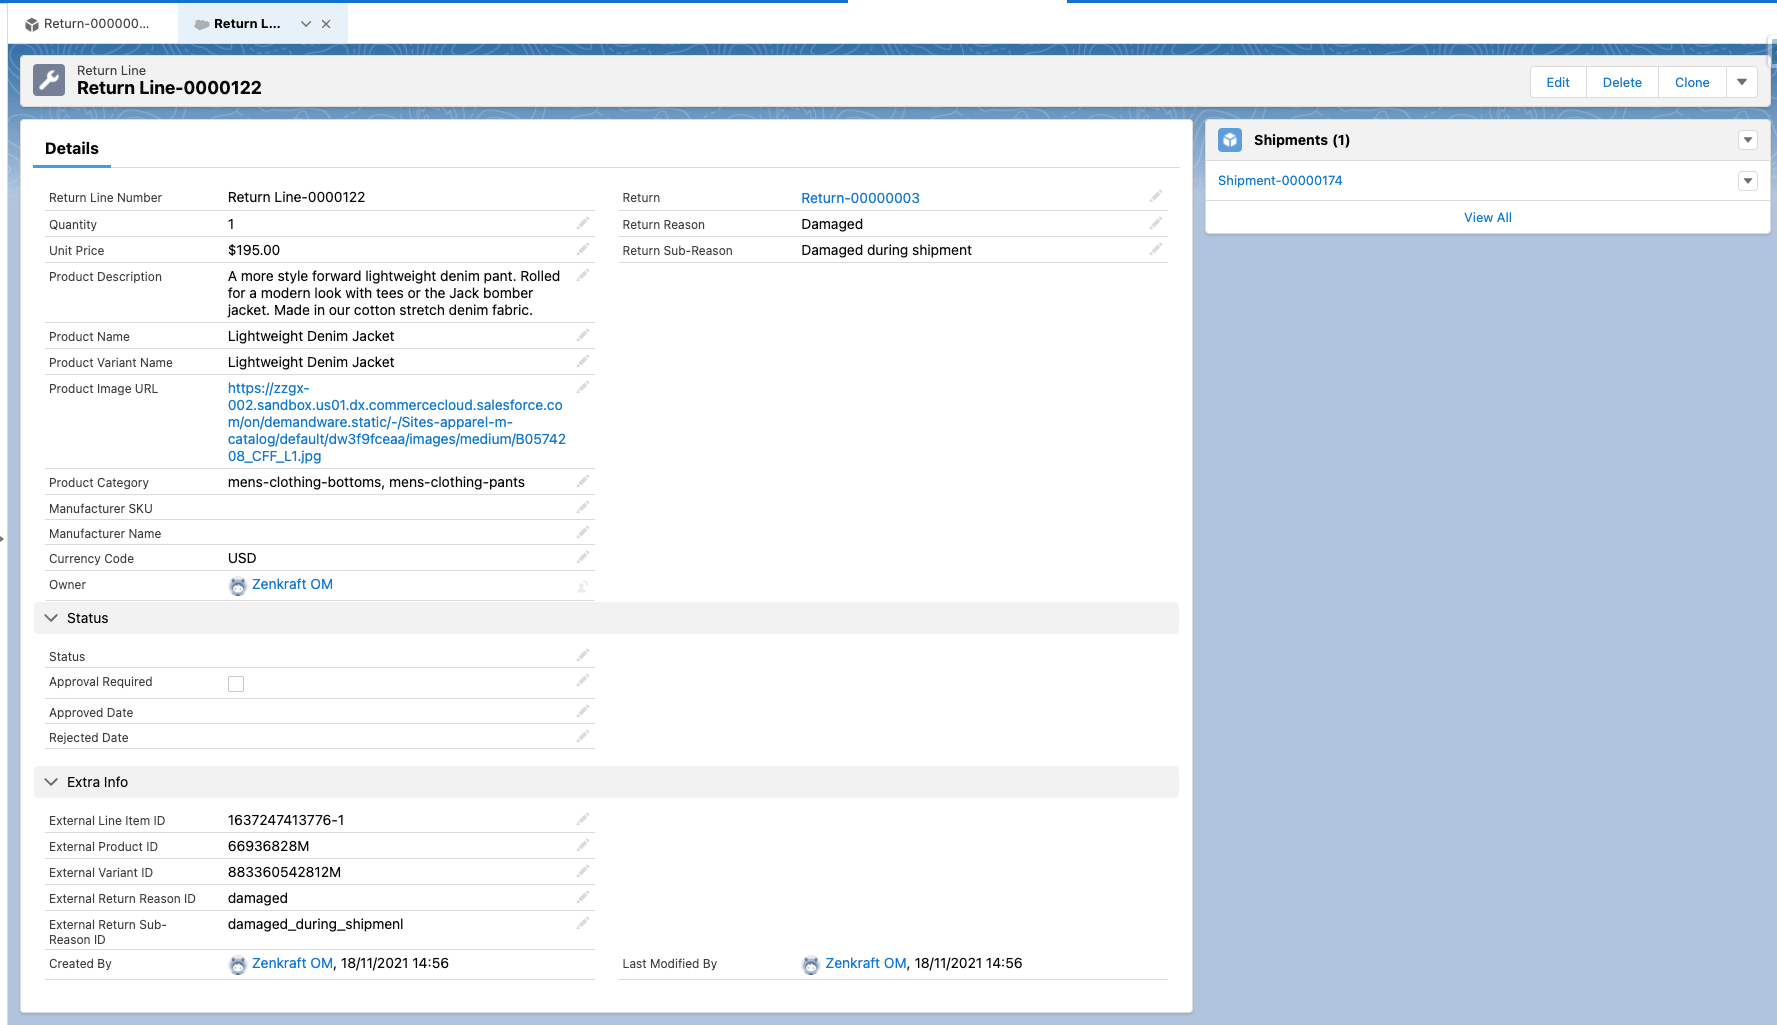
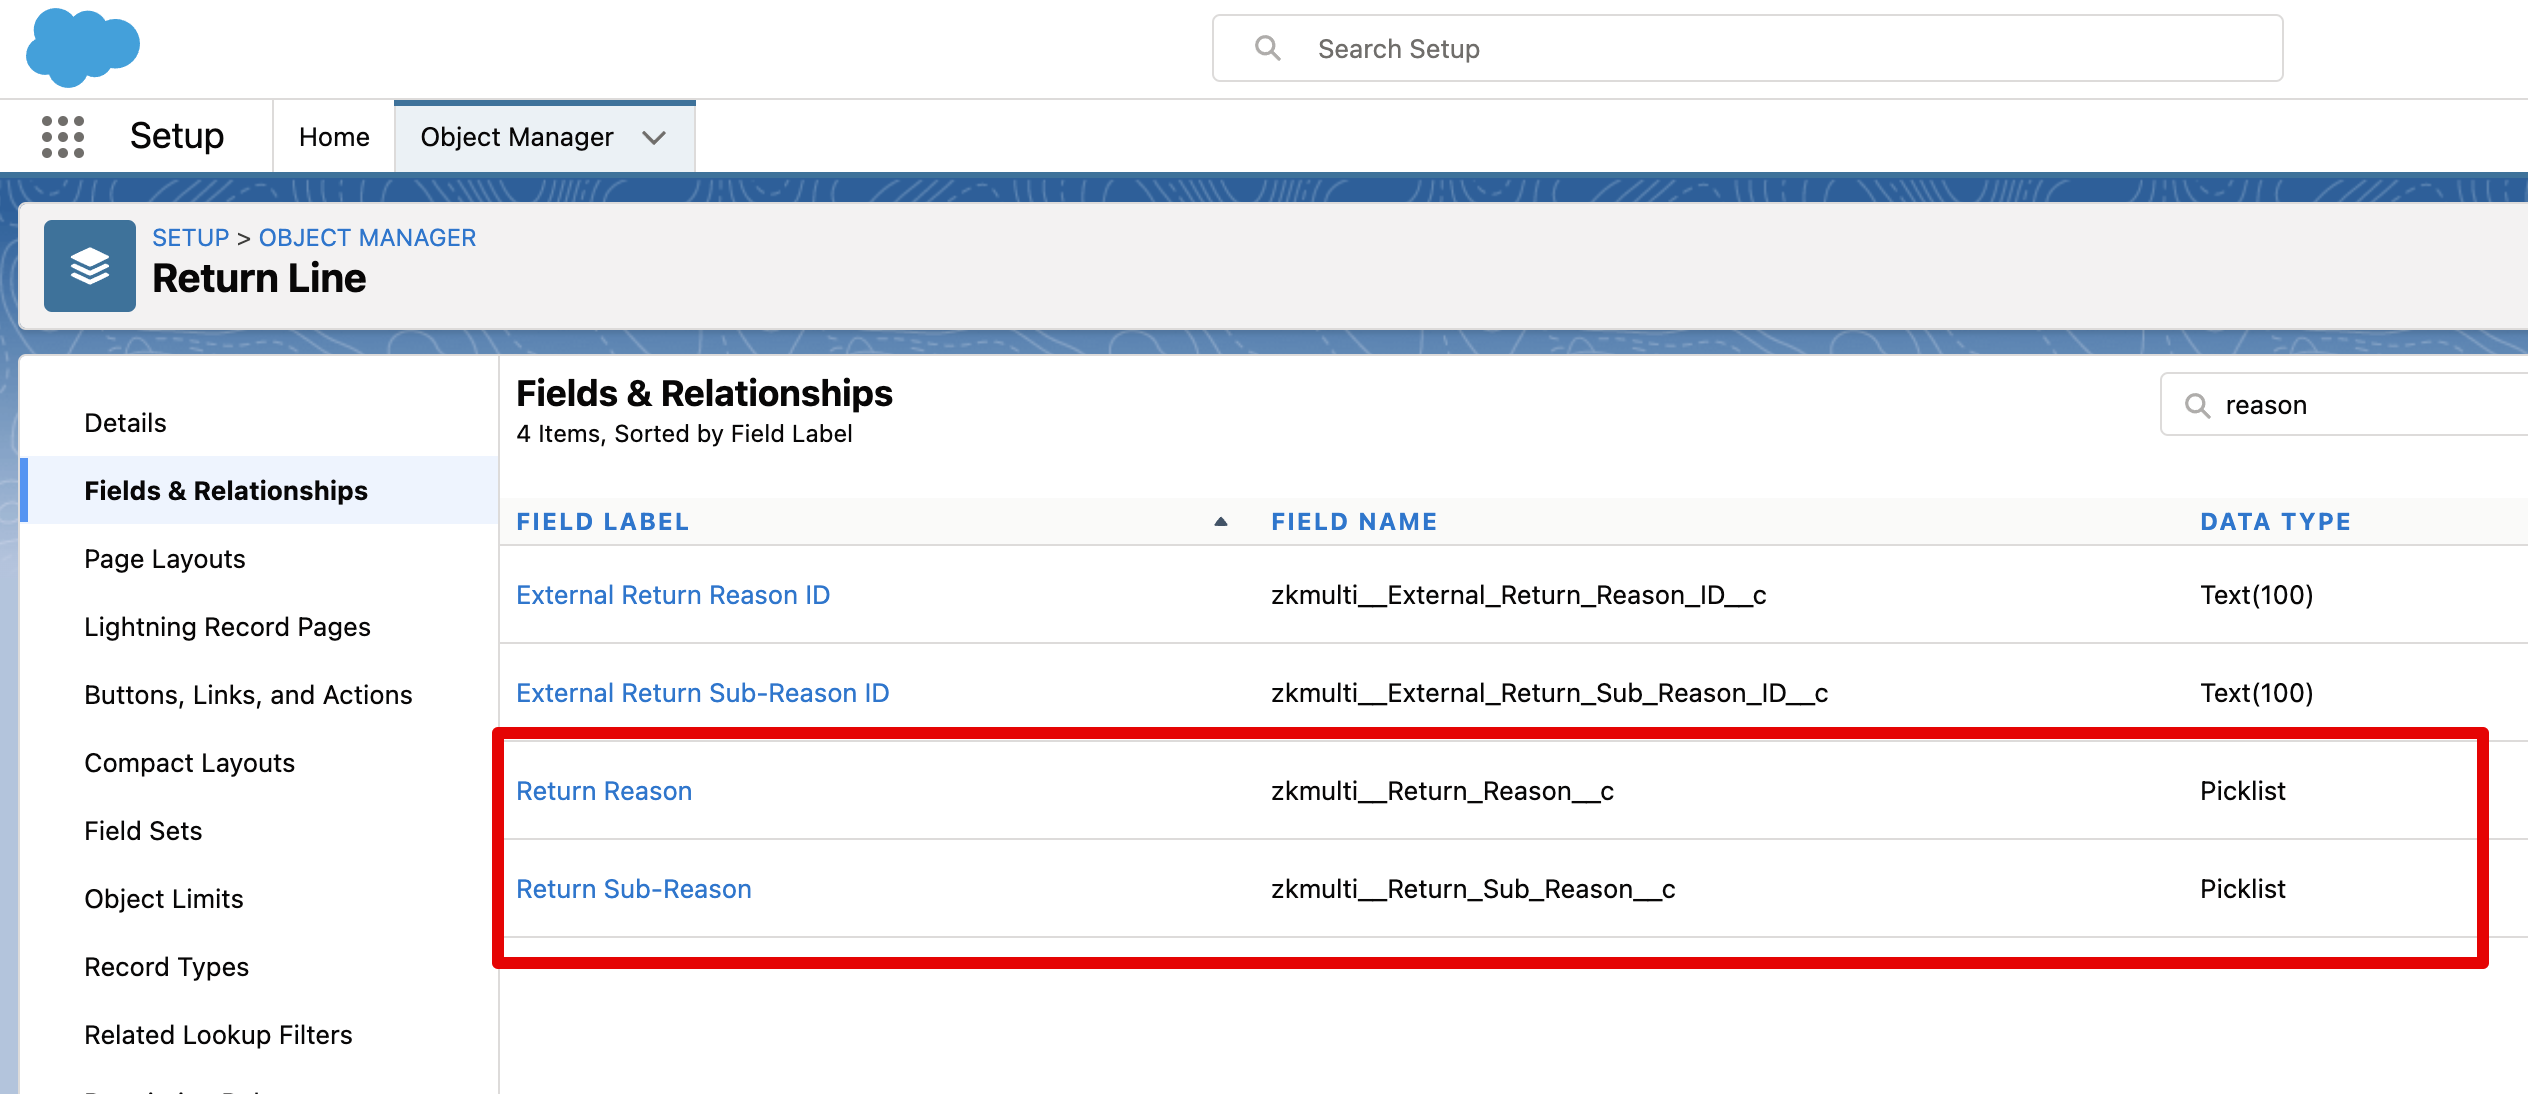
To avoid errors please make sure that the reason and sub reason values are the same on Salesforce objects as they are on your Return Reasons on Salesforce Commerce Cloud. Otherwise the returns will not be created successfully.
Resend returns
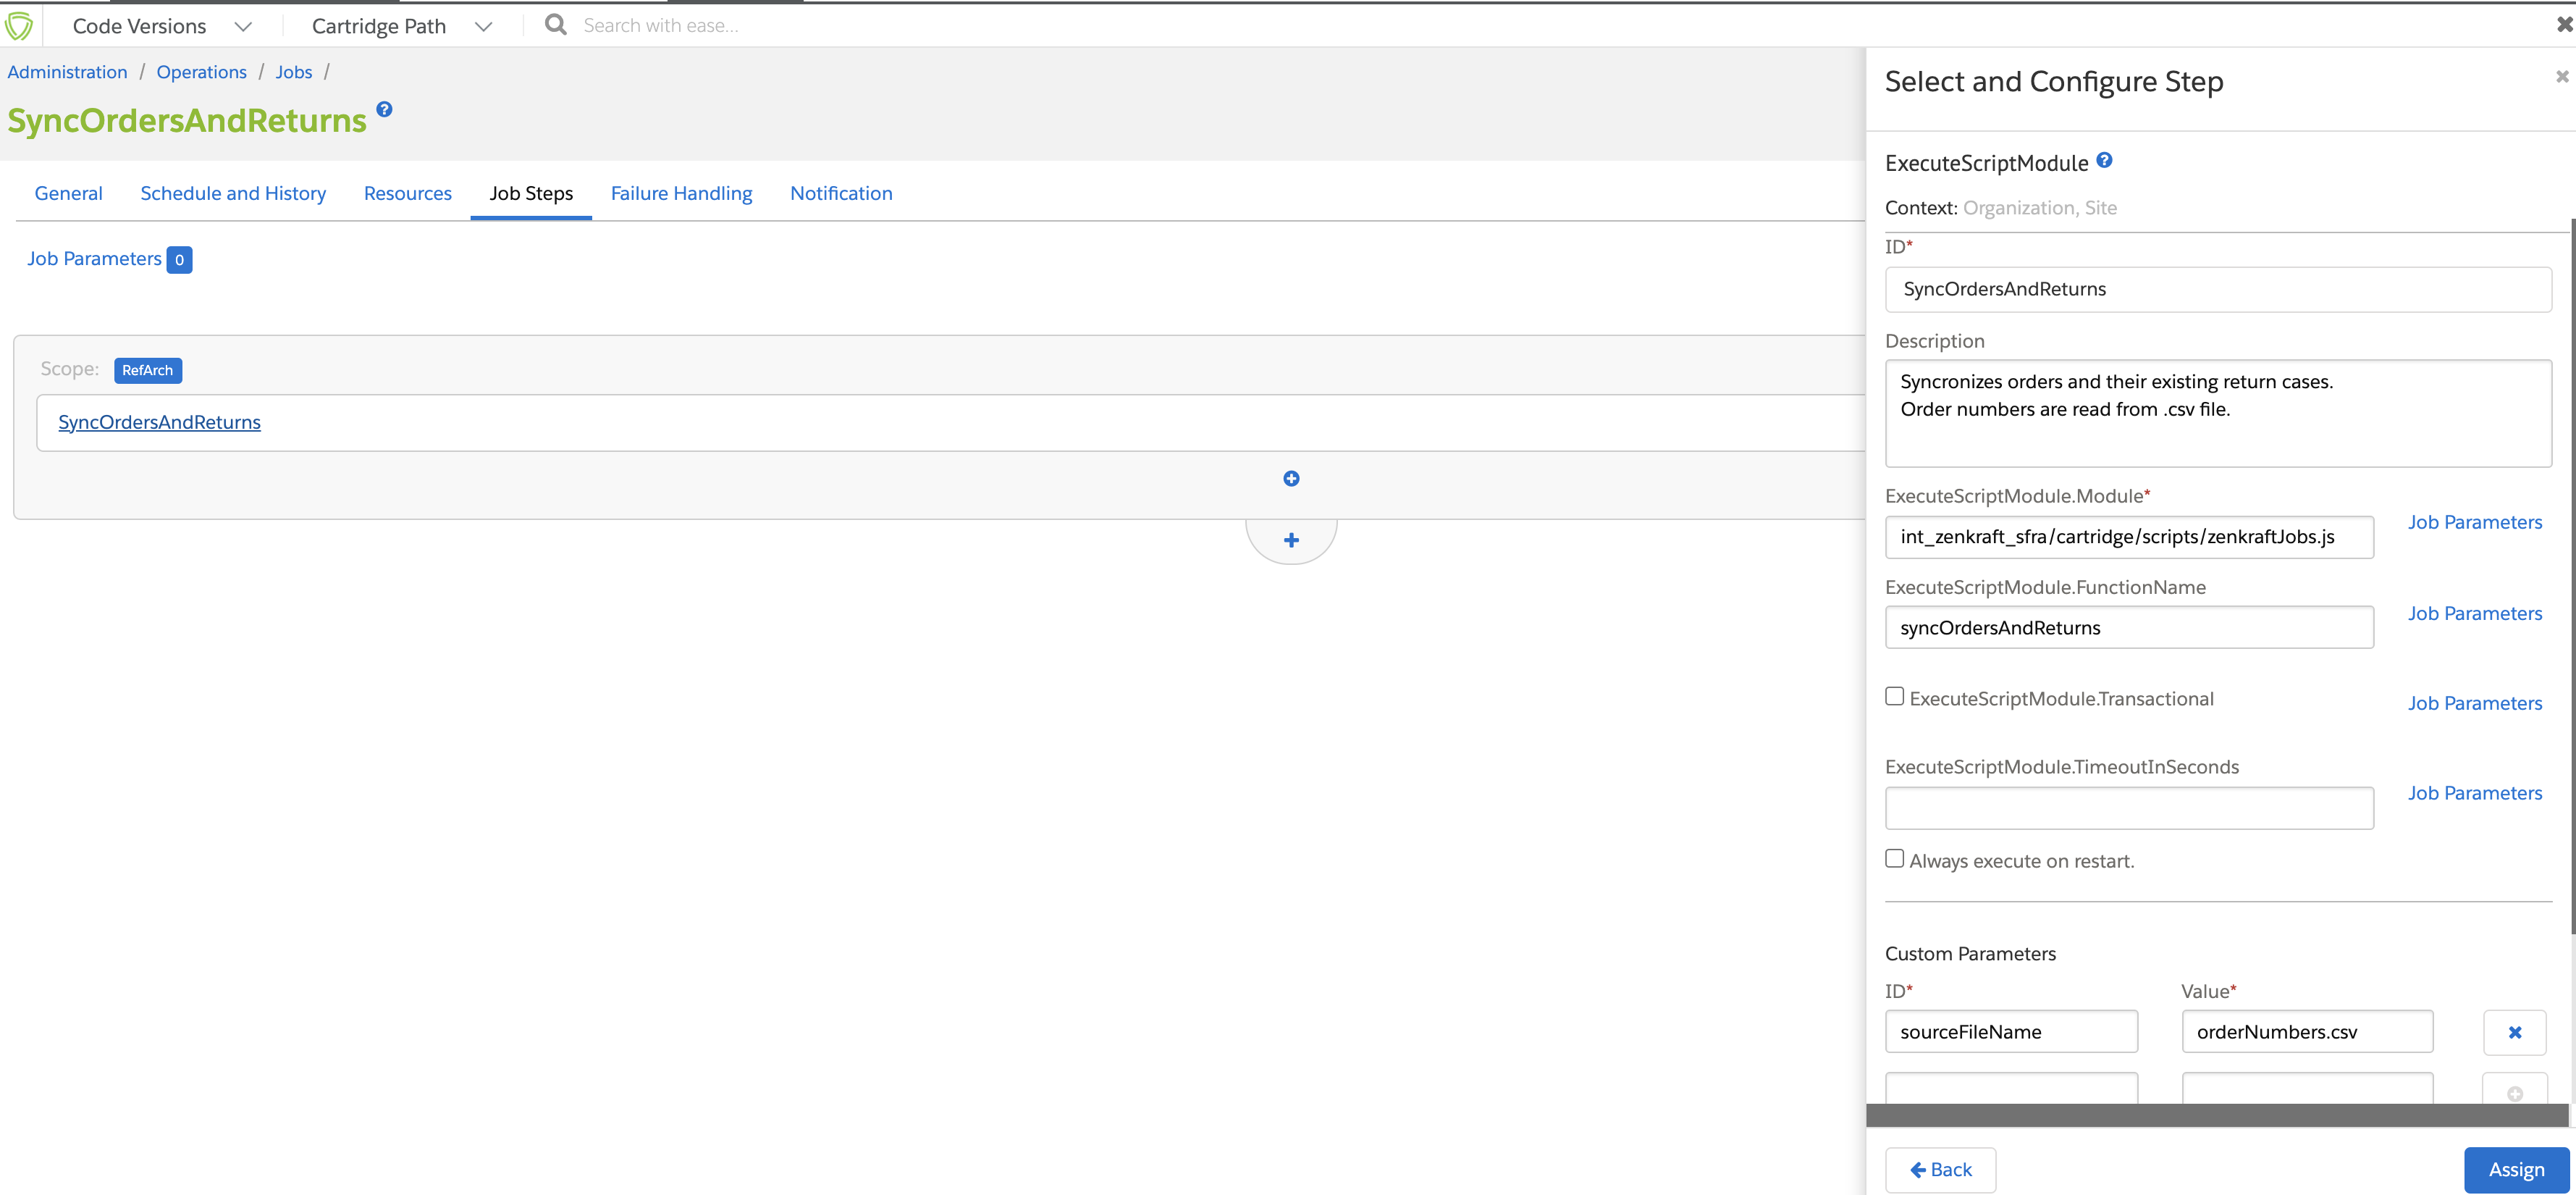
If you need to have your returns resend to Salesforce OMS/Service then you can utilize the job called SyncOrdersAndReturns.
Job Configurations
- Required files
CSV file containing the numbers of all orders that need to be synchronized. Every order number must be inserted on a new line in the file and the file must contain only one column and no header. - File path
File must exist in the SFCC file directory "impex/src/syncOrders/" - File name
File name must be configured in the Job Step as parameter "sourceFileName" with value of "*name of the file*.csv"
Running the job
- - Open SFCC Business Manager
- - Select Administration > Operations > Jobs
- - Select SyncOrdersAndReturns
- - Run Now button to run the job
Custom Fields
It is possible to add custom fields to the Returns and Return Lines.
1. Create the custom fields on the Return and/or Return Line object.
2. Modify link_zenkraft/cartridges/int_zenkraft_sfra/cartidge/scripts/zenkraft.js.
Line 736 to add custom fields to the Return object:
var req = {
    return: {
        return_id: returnID,
        custom: [
            {
                name: 'ID',
                value: 'Value'
            }
        ],
        order: {
            order_id: order.getOrderNo()
        },
        customer: {
            customer_id: order.getCustomerNo() ? order.getCustomerNo() : order.getCustomer().getID()
        },
        return_lines: getReturnLines(order, returnID, returnsRequireApproval),
        return_from: zenkraftSender,
        return_to: recipient,
        debug: advJsonSpec.IS_DEBUG || false
    }
};
Line 642 to add fields to the Return Line object.
returnLines.push({
                    shipment_id: zenkraftReturnLineItem.custom.returnShipmentID,
                    line_id: zenkraftReturnLineItem.custom.id,
                    quantity: parseInt(zenkraftReturnLineItem.custom.quantity, 10),
                    unit_price: lineItem.getPriceValue(),
                    currency: lineItem.getPrice().getCurrencyCode(),
                    reason: {
                        level1_code: reasonObject.id,
                        level1_text: reasonObject.value,
                        level2_code: subReasonObject.id,
                        level2_text: subReasonObject.value
                    },
                    product: {
                        product_id: product.getMasterProduct().getID(),
                        product_name: product.getMasterProduct().getName(),
                        product_category: getProductCategories(product),
                        description: product.getPageDescription(),
                        variant_id: product.getID(),
                        variant_name: product.getName(),
                        image_url: imageURL.indexOf('http') !== -1 ? imageURL : ''
                    },
                    approval_required: returnsRequireApproval,
                    attachments: attachments,
                    custom: [
                        {
                            name: 'ID',
                            value: 'Value'
                        }
                    ]
                });
Replace 'ID' with the API label of the custom field and 'Value' with the field type. For example:
name: 'custom_field__c'
value: 'text'
Run tests
To test the return labels, place an order and set the Shipping Status on the order to Shipped via Business Manager. Then open the order on the storefront via the Track Order page or the customer Order History. The Print Return Label link will show on the individual shipment for the order.
There are two types of returns available that is set via Business Manager. Automatically Approved or Requires Approval. If a product requires approval, the user will be notified that their approval has been requested. Once the return has been approved then the user is able to download and print the label.
If a product is automatically approved then the return label will be available for download and for printing by the user.
If the custom preference Returns Require Approval is set to no, then the user will automatically be taken to the next page to download and print a return label. Once they get the label, they are also shown a map and list of nearby locations that will accept the returned item for drop-off.
If the custom preference Returns Require Approval is set to yes, then the user will be informed that their return request has been sent to be approved.
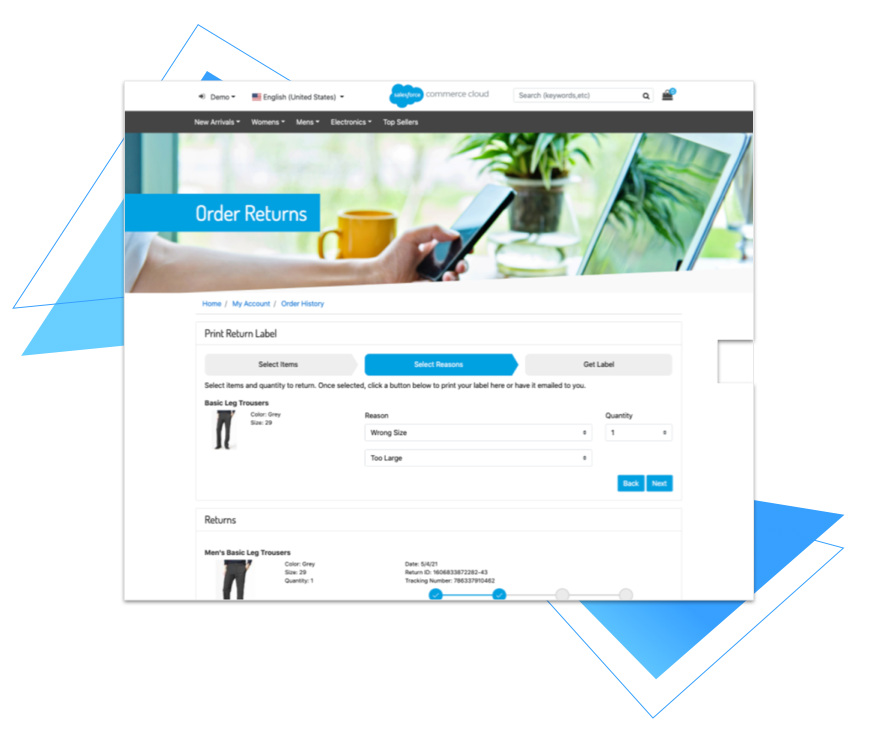
Screenshots - Approval Not Required
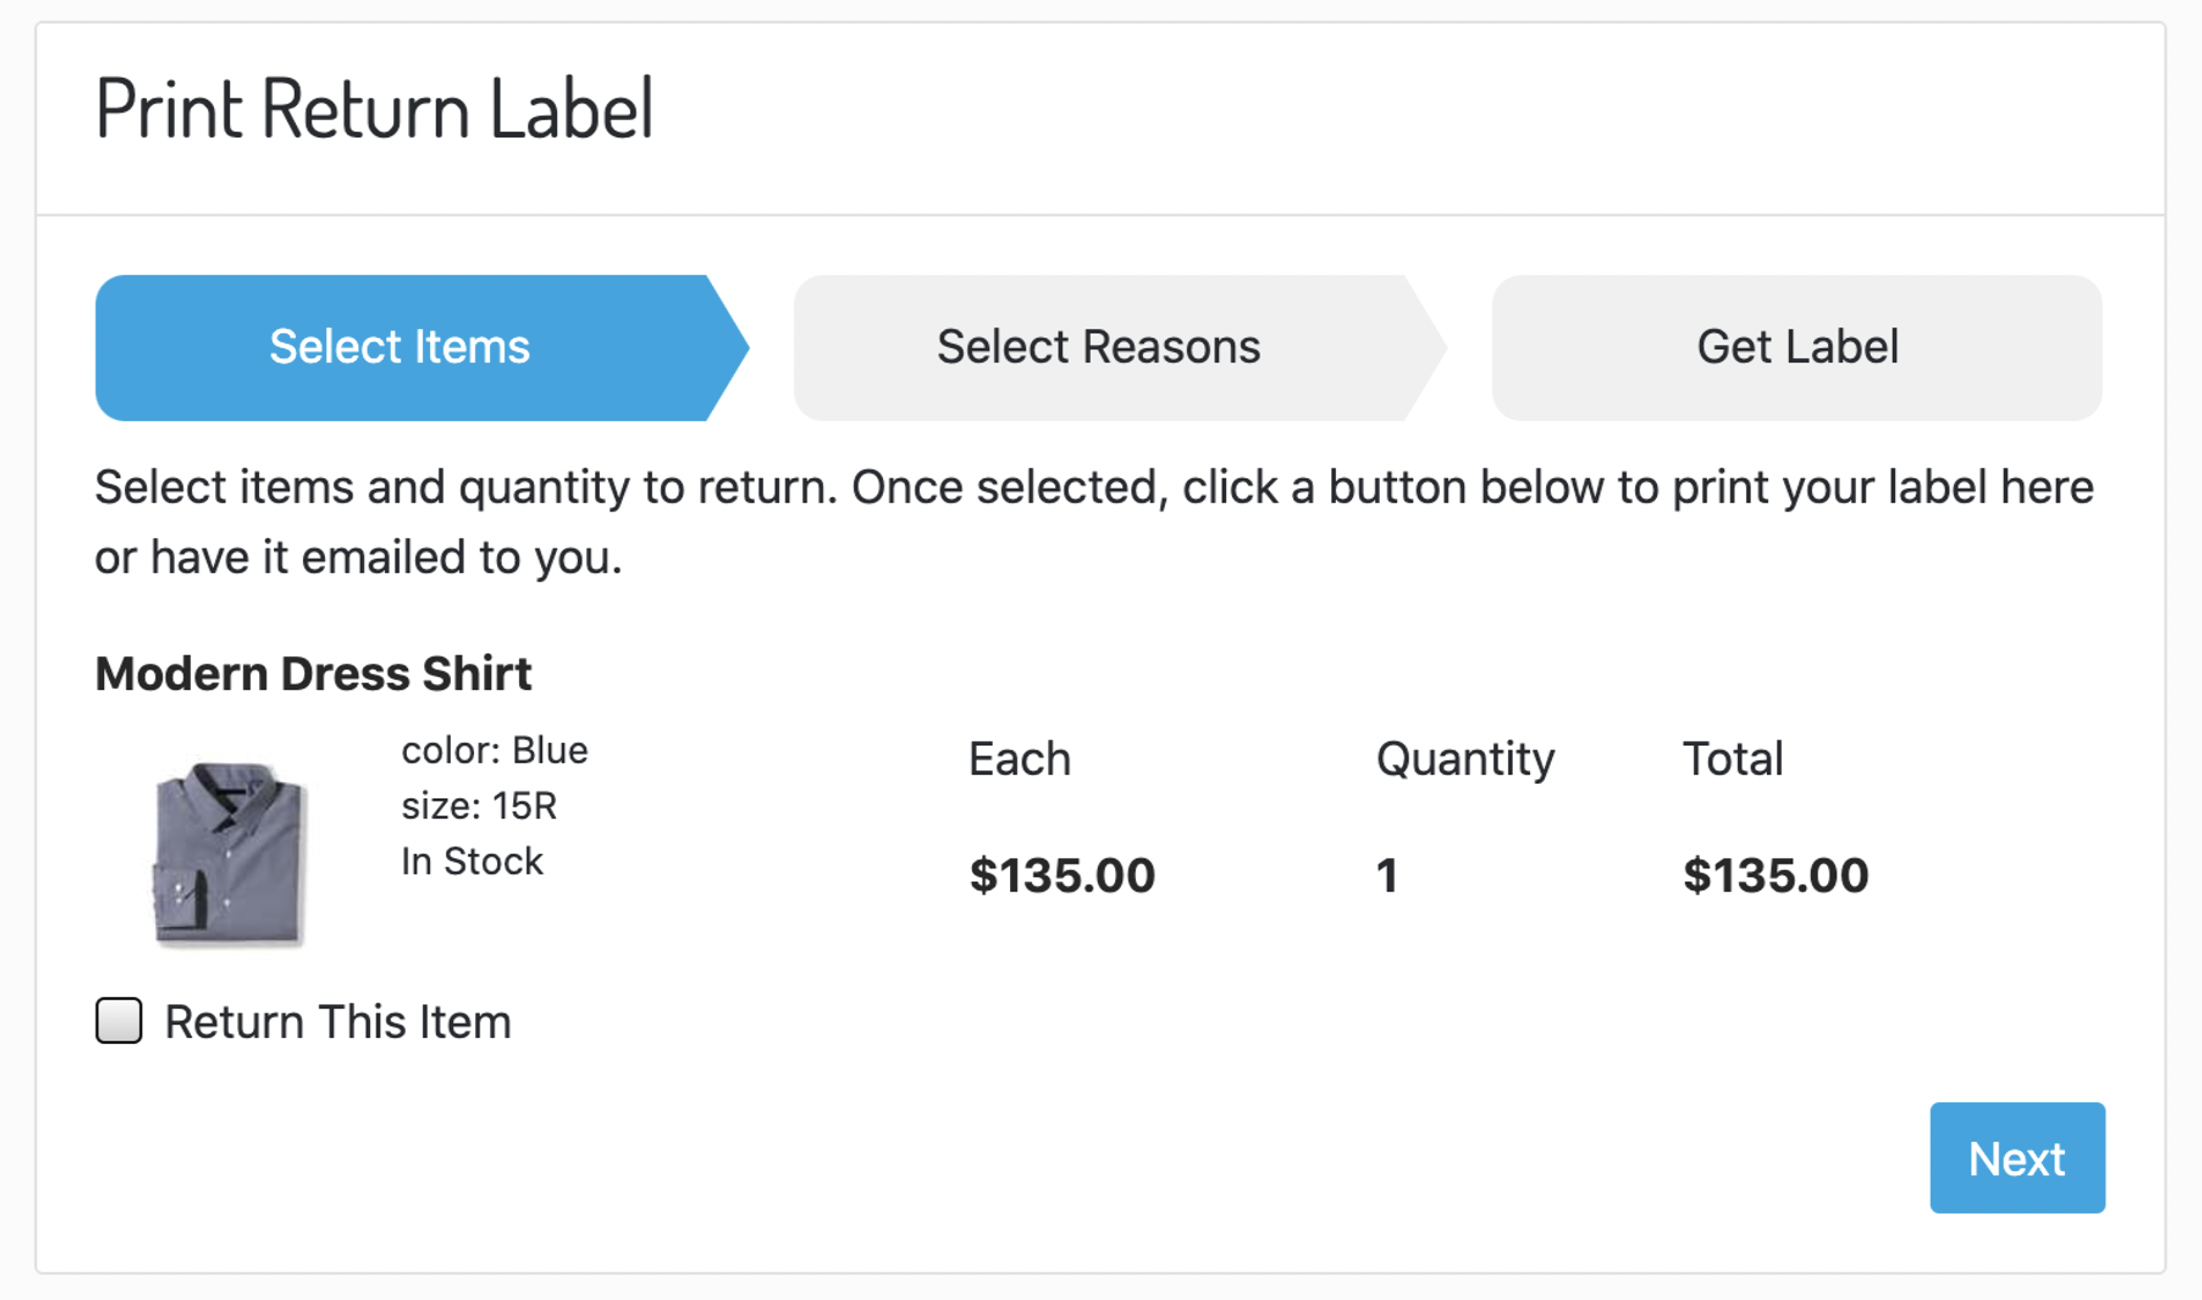
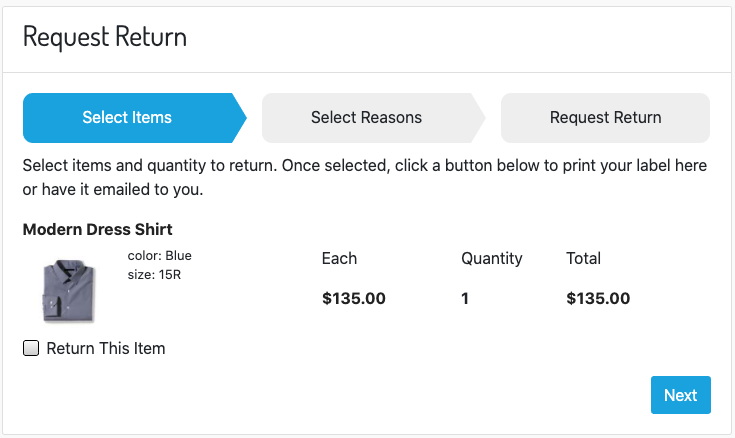
Step 1: Select Items Screen
All product line items from the selected order are listed in a table, so the customer can choose the items he wants to return
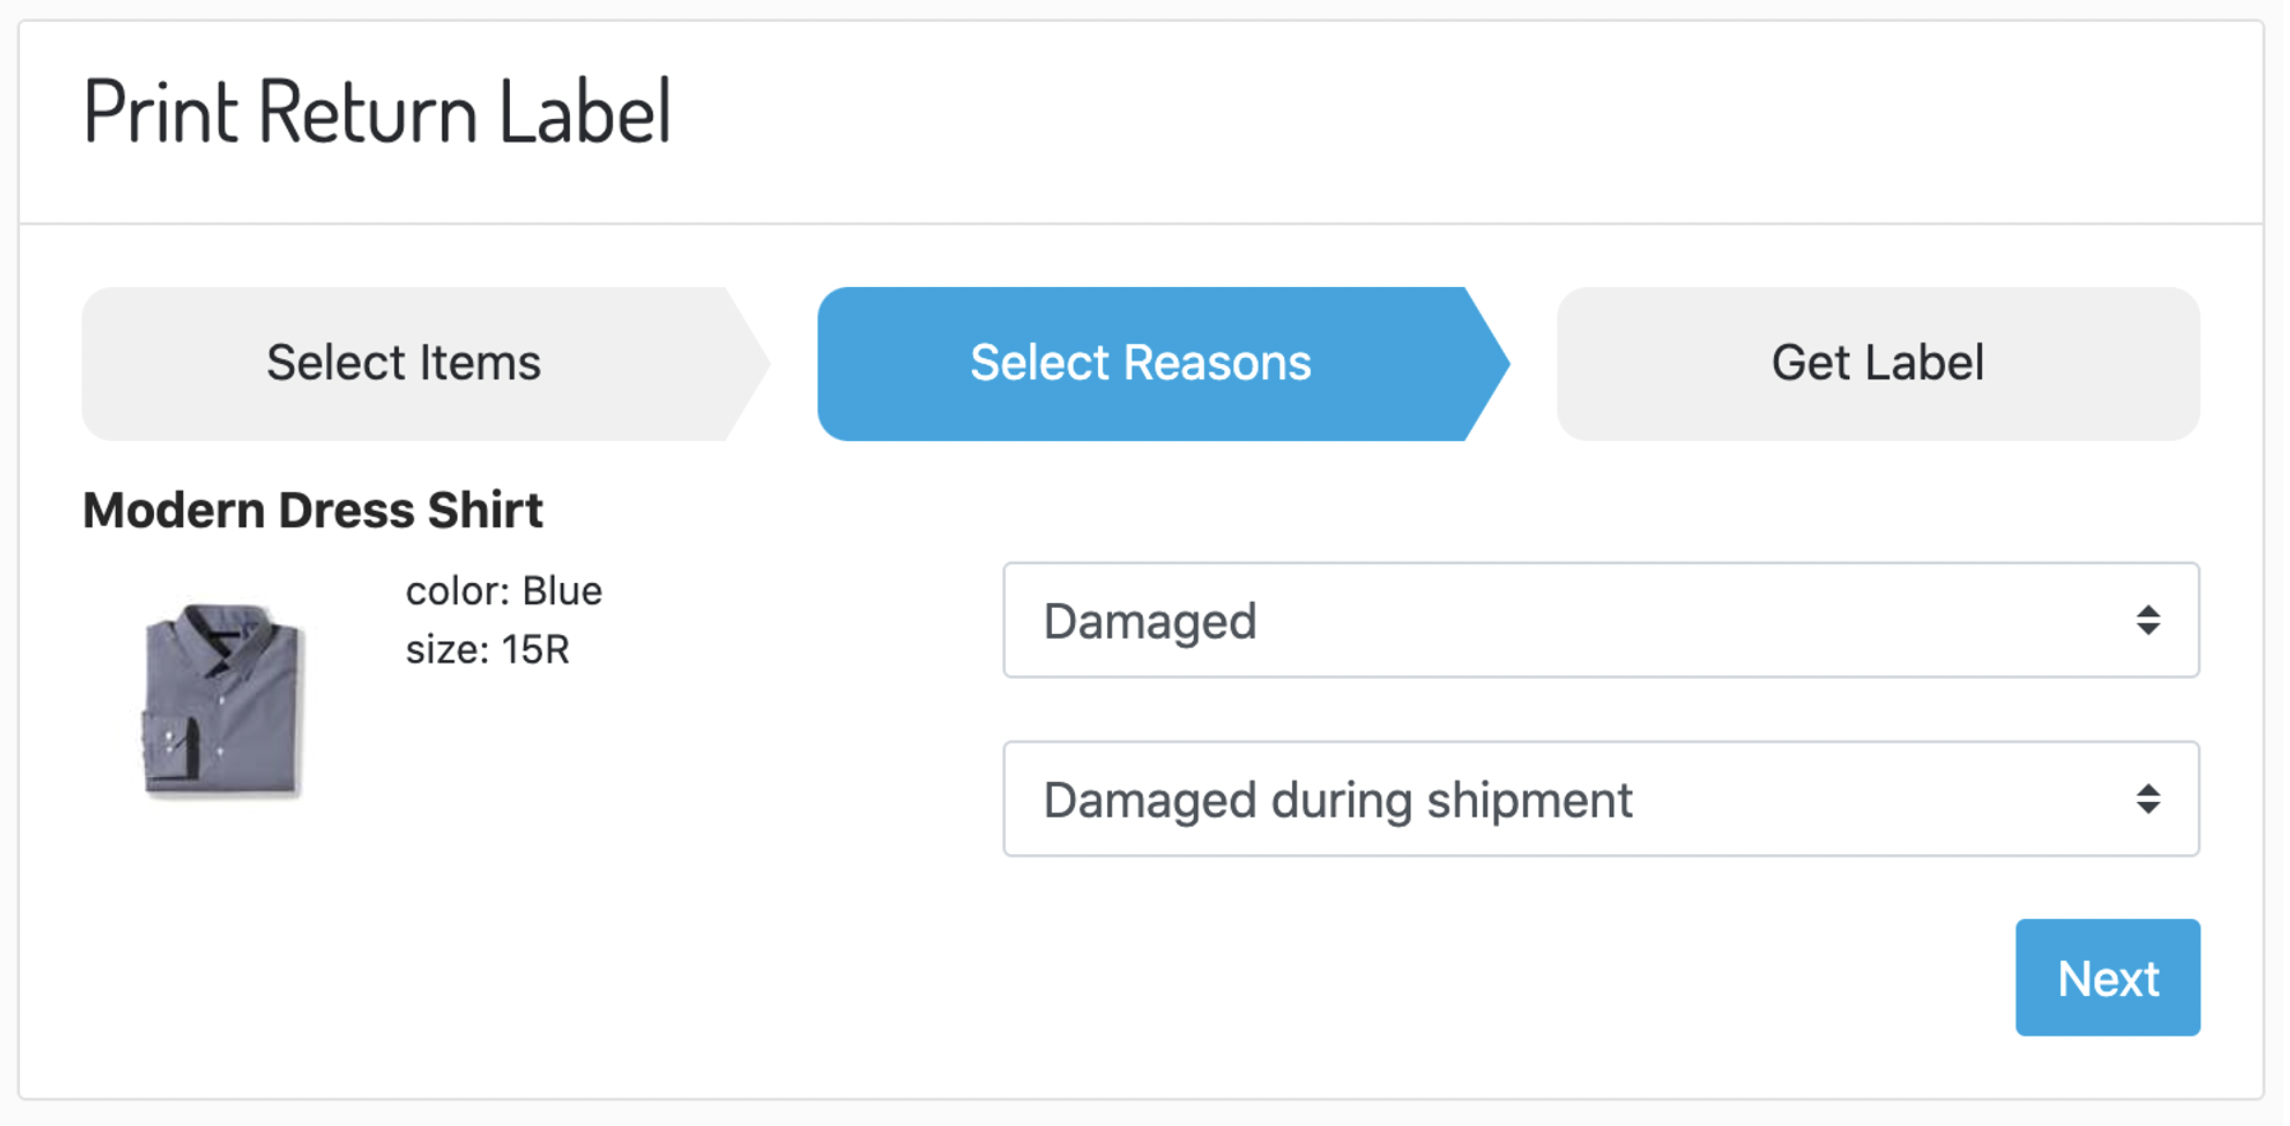
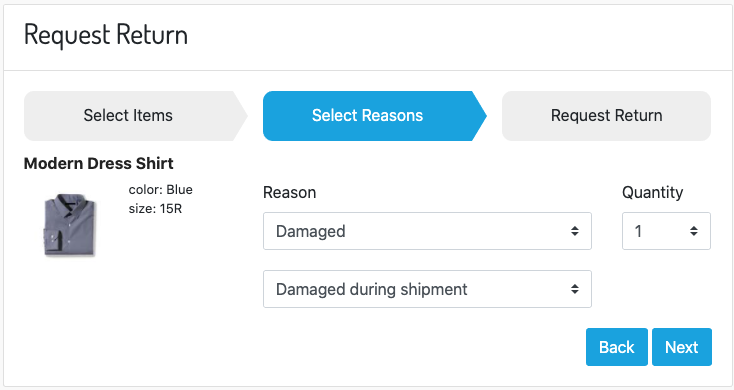
Step 2: Select Reasons for the return
Customer can selected from predefined list of return reasons. The list is configured in a Site Preference in the B2C Business manager
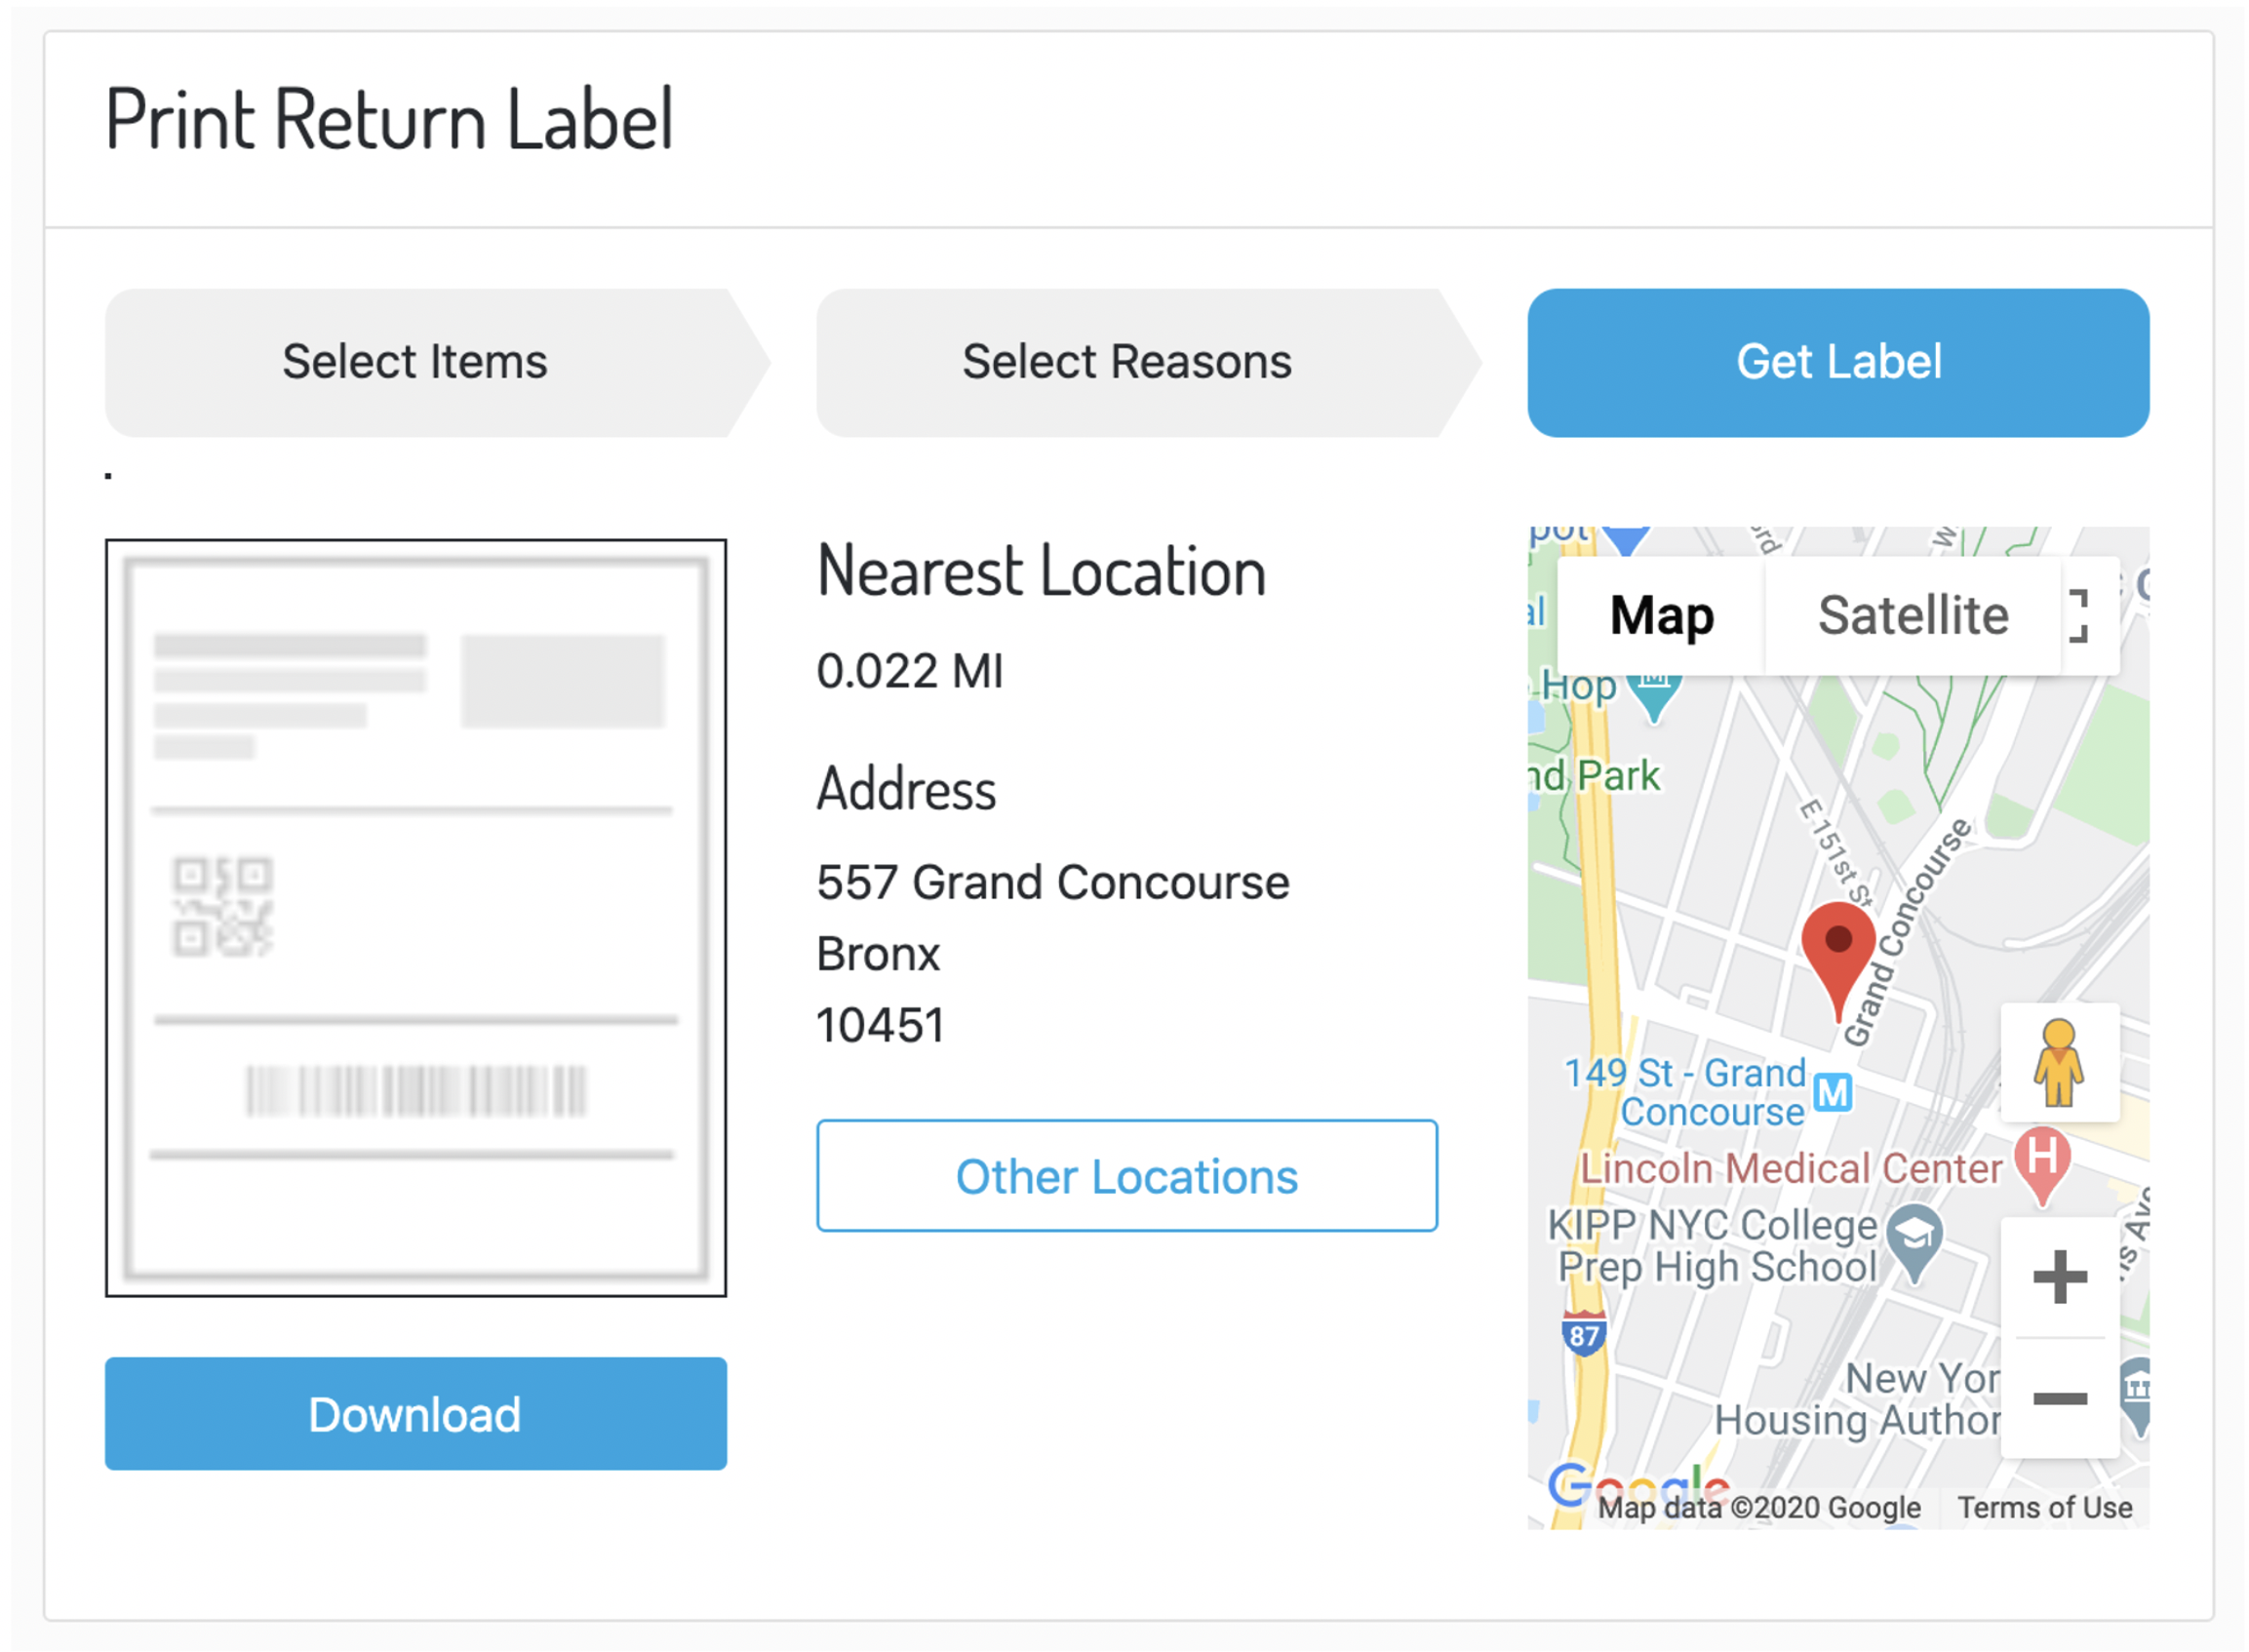
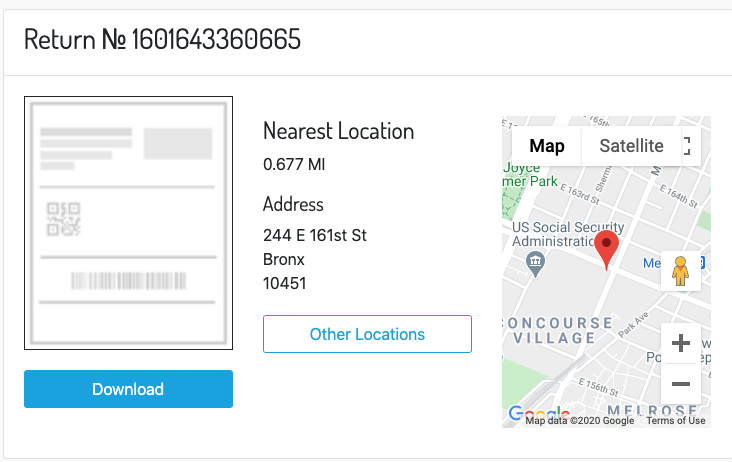
Step 3: Print Label and Nearest Locations
Once the customer has selected and submitted the reason for the return, the Zenkraft cartridge will generate a return label document (PDF or PNG) and display a link to download it, as well as a gmaps integration to display the nearest drop-off locations.
Screenshots - Approval Required
Similar to the Approval not required flow, the customer will be asked to select the items that he wants to return, and the reason for returning the item(s). However, the return label will not be generated until the return is approved.
Step 1: Select Items Screen
All product line items from the selected order are listed in a table, so the customer can choose the items he wants to return
Step 2: Select Reasons for the return
Customer can selected from predefined list of return reasons. The list is configured in a Site Preference in the B2C Business manager
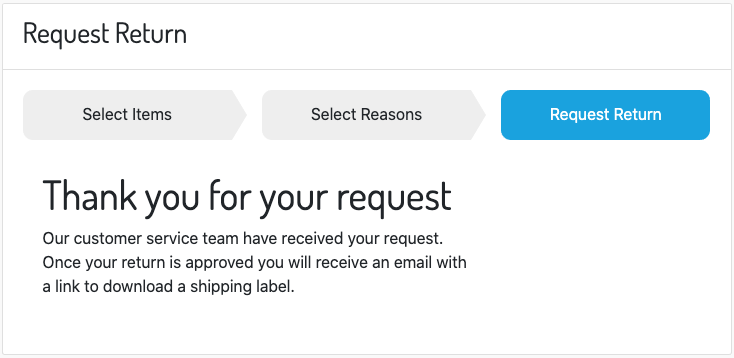
Step 3: Return Request sent for Approval
The return request is sent to the Zenkraft module, and waiting for an approval
Step 4: Return Approved
Once the return has been approved the customer will be able to see the success screen with the link for the return label and the list of the drop-off locations
Please contact us for any more information and for next steps.