Branded Tracking Guide
Zenkraft's Branded Tracking Add-on allows you to provide a seamless brand experience to your customers.
- Introduction
- Create the Public Tracking Site
- Enable Public Access Settings
- Enable Managed Package License
- Enable Tracking Checkpoints
- Create Branded Tracking Email Template
- Create the Email Alert
- Create a Process Builder to send out the email alerts
- Set your company colours, logo and header images
- Set up Multiple Branding pages
- Add a SkyScrapper Image and URL
- Create the Branded URL Formula
- Delete Branding Page
Introduction
Zenkraft's Branded Tracking Add-on allows you to provide a seamless brand experience to your customers. Branded tracking emails are sent at each important stage of a shipment ( or return's) journey. When the user clicks for more information they are taken to a branded tracking page which ultimately will drive more trusted traffic back to your website.
To set up Branded Tracking you need to firstly make sure you have a licence for it (or in sandbox it should already be activated for you). You can tell if you have a licence by Zenkraft Settings / Bringg Settings and finding the Branded Tracking tab.
If you don't see the Branded Tracking tab contact sales@zenkraft.com.
Then you will need to follow the below steps.
Create the Public Tracking Site
Go to Setup > Develop > Sites and click on the New Button.
Fill in the fields as you see in the below screenshot.
1. Set the URL that you want to use.
2. Activate the site
3. Open the search button
4. Search for our managed visualforce page called ShipmentTrack
5. Select it
Click Save to save your site setting.
Enable Tracking Checkpoints
You need to enable tracking checkpoints.
v1.113 and below: Go to Setup > Develop > Custom Settings and click on the Manage link for Zenkraft General Settings
Click on the Edit link
Make sure that the Record Shipping Checkpoints is set as shown in this screenshot:
v1.114 and above: Go to Zenkraft Settings / Bringg Settings > Other Settings and enable Record Shipping Checkpoints.
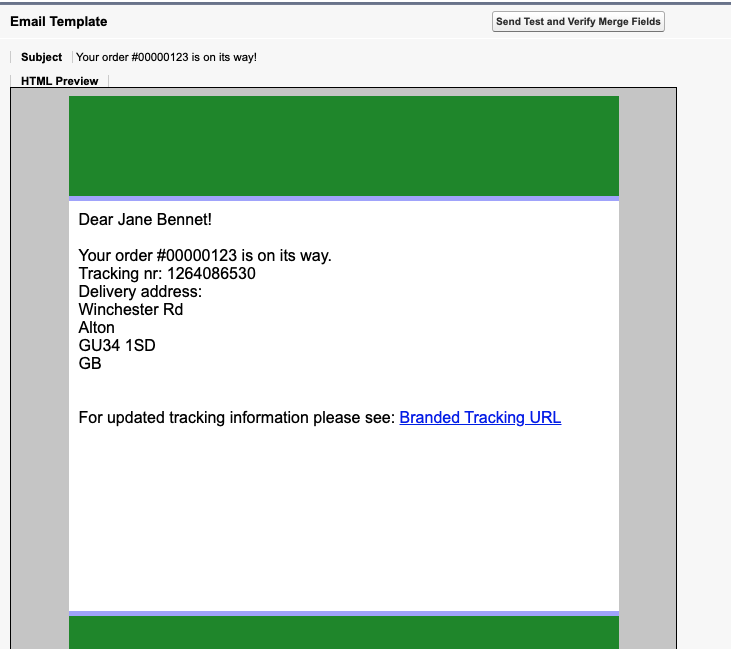
Create Branded Tracking Email Template
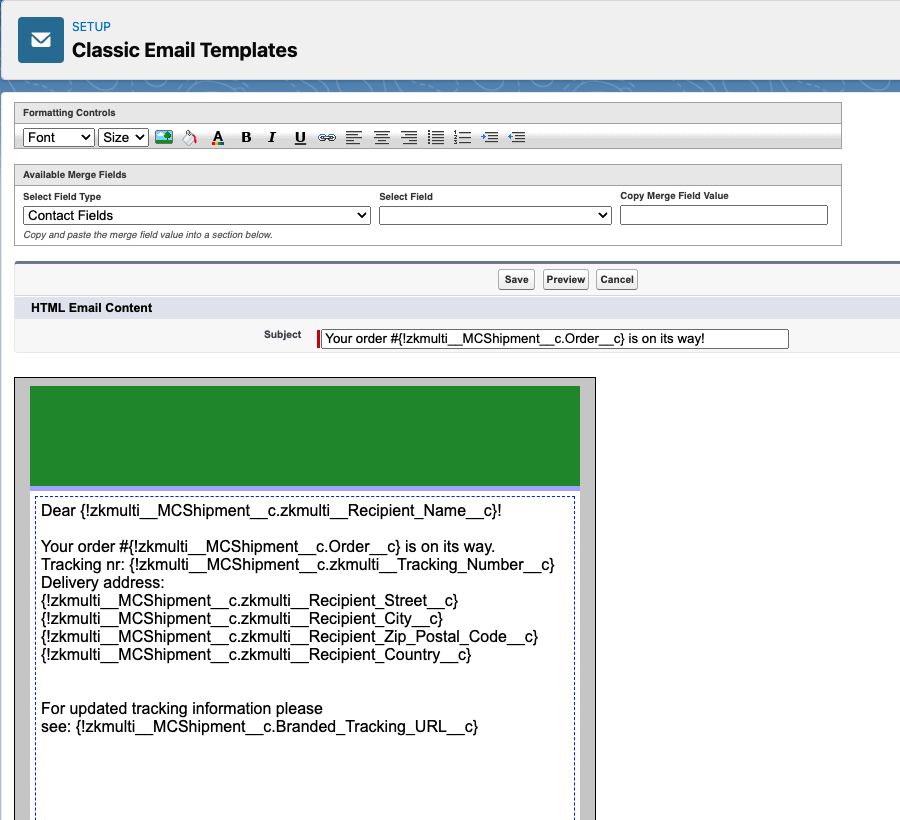
You can take advantage of the merge fields in Salesforce and pull the shipment information into a customized email template. Go to Setup > Classic Email Templates and create a new template.
Create a letterhead
- Navigate to Setup > Classic Letterheads and click New Letterhead.
- Select Available for use.
- Enter the letterhead label.
- Select a logo and/or customize the letterhead properties.
- Edit the remaining sections and save your changes.
Create the email template
Create the email template you want to use for the branded emails. You can create multiple templates for the different tracking stages.
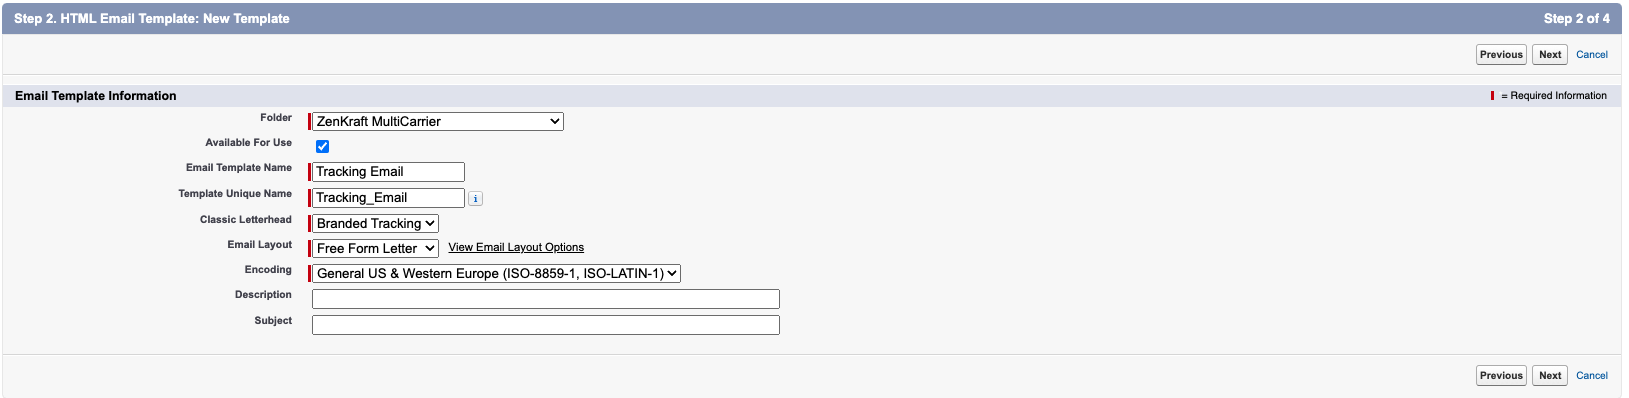
- Navigate to Setup > Classic email templates and click New Template.
- Select HTML (using Classic Letterhead).
- Select the folder where you want to save the template and click Available for use.
- Enter the template name.
- Select the Letterhead you created in the previous section.
- For the Email Layout select Free Form letter.
- Leave the Encoding as is.
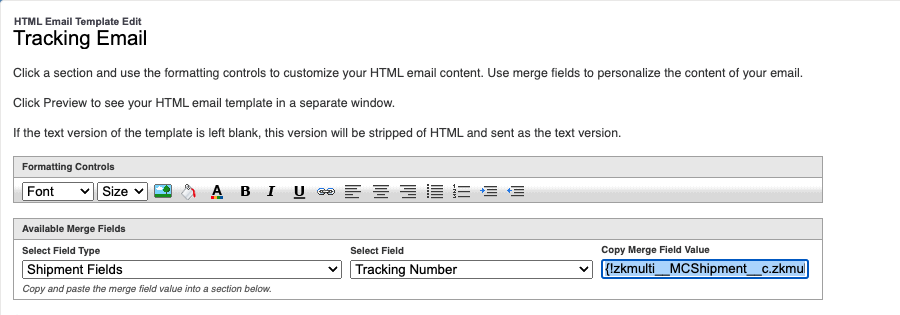
Add merge fields
Using merge fields makes your email template dynamic. You can pull in information such as the recipient's name, shipment details, etc.
Under Formatting Controls you can find the available merge field. You can find all standard and custom objects in this list. If you select "Shipment Fields" you will find the merge fields for the data stored on our Shipment record.
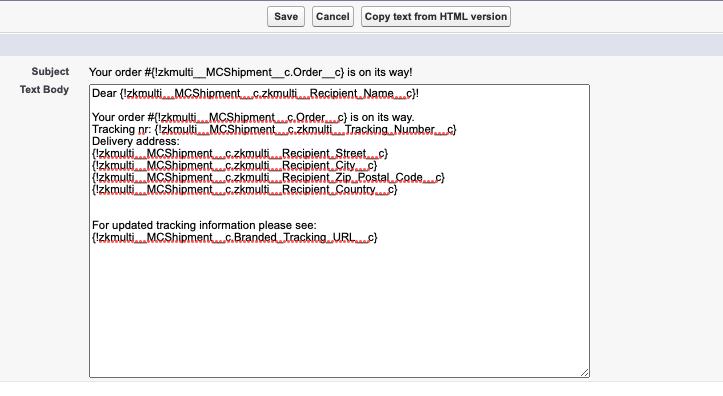
Test your email template
- Click on Send Test and Verify Merge Fields.
- Select a Shipment record you want to test with.
- Check the result.
Create the Email Alert
If you want to let your clients know, via branded email alerts, when there is a change in status of their shipment then follow these sets to set up a tracking notification.
Go to Setup > Create > Workflows & Approvals > Email Alerts and click the New Email Alert button.
Fill in the fields as you see in this screenshot:
1. Search for the Email Template
2. Select the Zenkraft MultiCarrier folder
3. Input "Tracking Email" and click Go.
4. Select the "Tracking Email" that comes up.
5. Under Recipient Type choose "Email Field" and then choose Recipient Email.
6. Click Save.
Create a Process Builder to send out the email alerts
Next you need to create the Process Builder task.
Go to Setup > Create > Workflows & Approvals > Process Builder and click the New button.
Give the process builder a name and choose to start the process when a record changes
Fill in the fields as you see in these screenshots:
1. Choose the Shipment object and start the process when a record is created or edited.
2. Set the criteria to be run when the Tracking Stage is changed.
3. Under immediate actions set the action type to be "Email Alerts" and then find the email alert you created earlier.
4. You are then all set. Don't activate the process builder until you have finished this guide and set up the logos, header and colours which you can see in our next step.
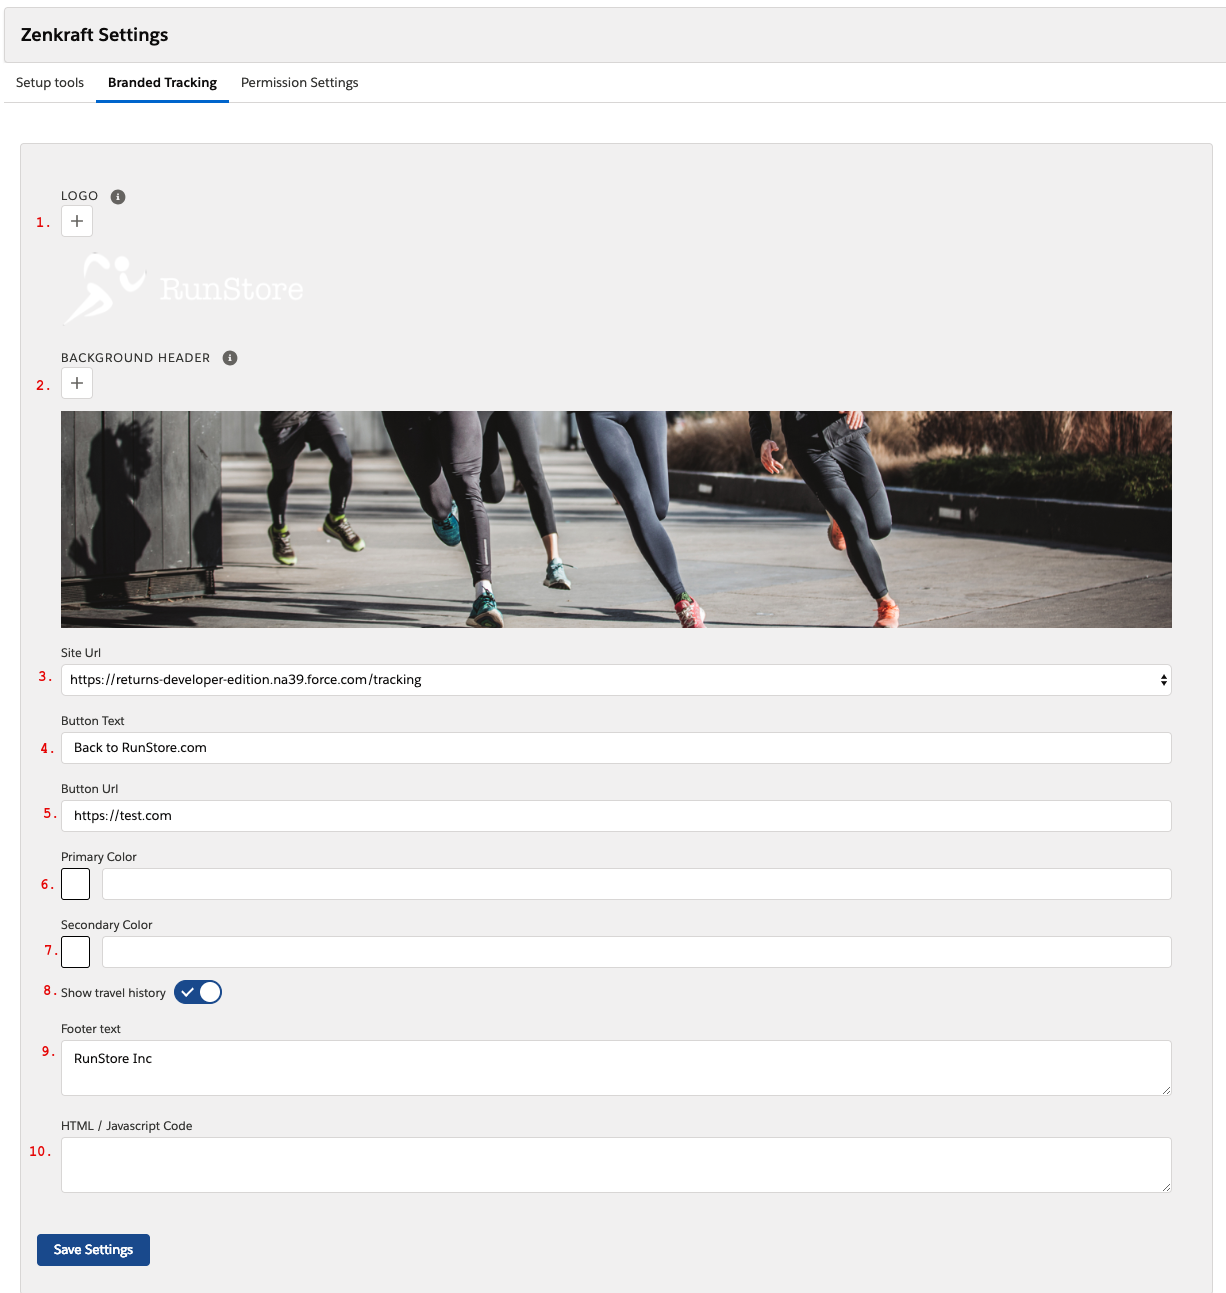
Set your company colours, logo and header images.
Open the Salesforce tabs and go to Zenkraft Settings / Bringg Settings, and select the Branded Tracking tab.
There are 10 settings you can fill in:
- Your logo. We recommend a size of 170px wide by 60px high, a PNG works well.
- Your background header. We recommend a size of 1400px wide by 175px high, a PNG works well.
- Select the site you created earlier so.
- Set the text you want to appear in the button on your force.com tracking page.
- Set the URL you want the above button to direct your users to on the tracking page.
- Set your primary colour, this is a hexadecimal value so something like #34AF34.
- Set your secondary colour, this is a hexadecimal value so something like #34AF34, or you can even type in a color, for example green.
- This is a toggle so your users can see the whole travel history if you activate it.
- This is where you can put some text at the bottom of the tracking page.
- If you have any google analytics or chatbot code you can simply add it here.
Set up Multiple Branding pages
It's easy to set up Multiple Branded Tracking pages.
The first step is to create each of your different branding pages which you can do by clicking the [+] icon and filling in the details for each one as per the above steps.
Next, in your Custom Address Source you need to make sure that you have a field on your original object that specifies the Brand name that the shipment would apply to. In the screenshot above the names would be "Brand A", or "Brand B" or "Brand C".
Once you have that field set up on the same object you are using in your Custom Address Source, you can then reference the Brand field which you can find once you edit the Custom Address Source.
Add a SkyScrapper Image and URL
If you want to add a skyscraper to the side of the tracking page to let your customers know of any new products/services that's very easy to do.
At the bottom of the branding settings page you have a switch called "Enable Upsell Skyscraper".
Once activated you are able to set the Title, upload an image, and set the URL. This will then be shown on all tracking pages.
If you need more flexibility you can also use the Dynamic fields to select a field related to the shipment object that stores this image and URL data.
Create the Branded URL Formula
You will need to create a text type formula field on the Zenkraft Shipment for the Branded Tracking link.
Go to Setup > Object Manager > Shipment > Fields & Relationships and click on New.
Create a Text type formula field and Name it Branded Tracking URL.
Create a formula like this, where you replace the "yourtrackingpage" with the site URL from your
Brand.
HYPERLINK("https://yourtrackingpage.force.com/tracking/?id=" + Id, "Branded
Tracking URL")